
I Glued a Floor Down and Then Couldn’t Get It Up
I helped a friend install hardwood flooring in his living room. He had bought solid oak — the real stuff, 3/4-inch thick, prefinished — and the instructions said it could be nailed down or glued down. He chose glued. “Nails leave holes,” he said. “Glue is cleaner.”
Four years later, his water heater leaked and damaged three planks near the hallway. He called me to help replace them. Nailed-down flooring comes up plank by plank — you cut out the damaged one, chisel out the tongue, nail in a replacement. Glued-down flooring comes up in splinters. The adhesive had bonded so thoroughly to the subfloor that removing the damaged planks destroyed the surrounding ones. What should have been a three-plank repair became an entire corner of the room. He had to replace 40 square feet of hardwood because the glue wouldn’t release.
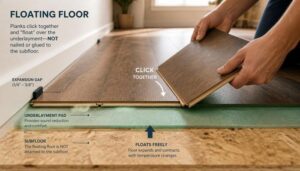
Nail-down, glue-down, and floating are three completely different installation methods with completely different trade-offs. Here’s how to choose.
Nail-Down (or Staple-Down)
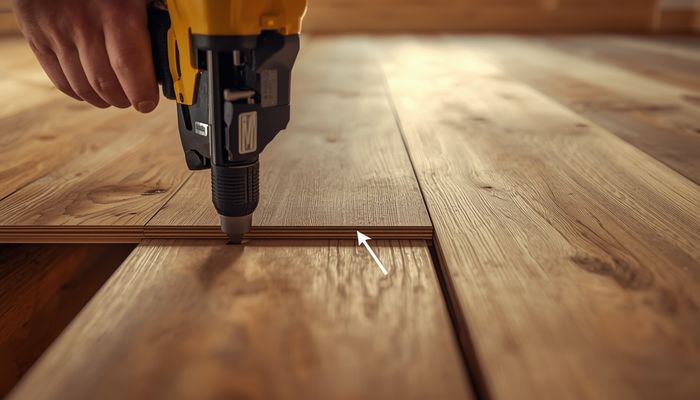
Nails or staples are driven through the tongue of each plank at a 45-degree angle into the subfloor. The fastener is hidden inside the tongue-and-groove joint — you don’t see nail holes on the surface. This is the most common installation for solid hardwood and engineered hardwood over a wood subfloor.
What I use: A pneumatic flooring nailer (I rent the Bostitch MIIIFS, $45/day from Home Depot). It drives 2-inch L-cleats that grab the subfloor better than staples for hardwood. For engineered flooring, I use staples (the Bostitch BTFP12569, $40/day) because they’re thinner and less likely to split the narrower tongue on engineered planks.
Good for: Solid hardwood, thick engineered hardwood (3/8-inch or thicker), any room above grade with a plywood subfloor. The floor feels solid — no hollow sound, no flex. Individual planks can be replaced relatively easily.
Bad for: Concrete slabs (you can’t nail into concrete). Thin engineered flooring with a narrow tongue (the nail will split it). Radiant heating systems (nails can puncture the tubing). Any installation where you might need to remove the floor later without destroying it.
Cost: About $30-50 in cleats/staples for a 200 sq ft room, plus $45-90 in tool rental. Total: $75-140.
Glue-Down
The flooring is bonded directly to the subfloor with a trowel-applied adhesive. No fasteners. This is the method for installing over concrete slabs and for some engineered products.
The adhesives I’ve used: Bostik’s Best ($35/gallon, covers about 50 sq ft) — a moisture-cure urethane that grabs instantly and doesn’t let go. For smaller jobs, Bostik GreenForce ($28/gallon) has less odor and cleans up with water while it’s wet. Both require a notched trowel (1/4-inch V-notch for most applications) and a respirator — moisture-cure urethanes are noxious until cured.
Good for: Concrete slabs. High-moisture areas (the adhesive acts as a moisture barrier). Installations where you want absolutely zero movement or squeaks. Engineered flooring with thin profiles that can’t be nailed.
Bad for: Any floor you might want to remove later. DIYers working alone (the open time is short — you have about 30-60 minutes before the adhesive skins over). Plywood subfloors (gluing to plywood is permanent and the plywood will get destroyed if the floor ever needs to come up).
The mistake I see most: Not troweling evenly. You need 100% coverage under every plank or the floor will have hollow spots that sound different when you walk on them. After spreading the adhesive, I press a plank down, then lift it back up to check coverage. If I don’t see adhesive on the entire back of the plank, I’m not spreading enough.
Cost: $70-140 in adhesive for a 200 sq ft room, plus $15 for a trowel. No tool rental needed.
What I Actually Recommend
For 95% of homes, nail-down over a wood subfloor. It’s faster (you don’t wait for adhesive to cure), it’s reversible, and it feels solid. For concrete slabs, glue-down is the only option unless you’re installing a floating floor.
My friend’s glued-down oak floor is still there, still beautiful, and will probably outlive the house. But if another plank gets damaged, he’s calling a professional and letting them deal with the splinters. I’ve done my time with a chisel and a can of adhesive remover. Never again.
First time working with vinyl plank and I learned you need the right blade. Used a cheap utility knife and got ragged cuts.
I’ve tried this approach in my own home. Results were good but not miraculous. Solid option for the price point.