
The first time I tried to install a floating floor, I locked myself into the bathroom.
Not figuratively. Literally. I’d started in the hallway, clicked my way across the bedroom, and worked right up to the bathroom door. Every plank I laid behind me meant one fewer step I could walk on. By the time I reached the bathroom threshold, I was standing on the last two square feet of bare subfloor, trapped. I had to climb out the window and walk around to the front door.
That’s the thing about floating floors. They’re stupidly easy to install — until they’re not. And the beginner mistakes are almost always the same ones I made that afternoon: starting against the wrong wall, not staggering your seams right, and forgetting you need an exit strategy.
I’ve since laid floating floors in three houses. Two of those installs are still holding up great. One I had to tear out and redo because I didn’t leave enough expansion gap around the fireplace hearth. The planks buckled in July when the humidity hit. Sounded like a gunshot when the seam let go at 2 AM. Scared the hell out of my wife.
So here’s what a floating floor actually is, from someone who’s done it wrong enough times to finally do it right.
The Click-Lock Thing Is Real Engineering
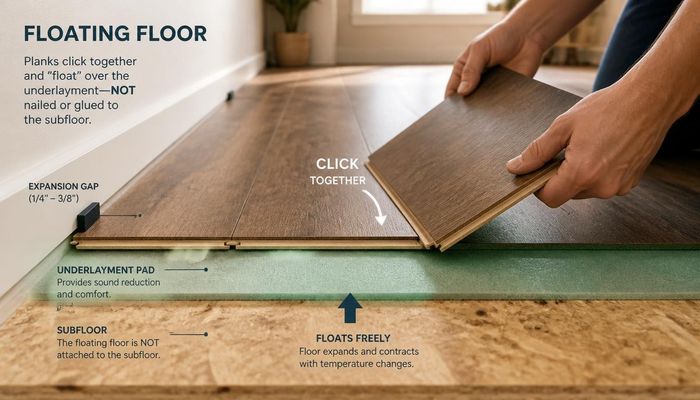
A floating floor means the planks connect to each other — not to the subfloor. No glue. No nails. No staples. The entire floor sits on top of a thin foam or cork pad and stays put from its own weight and the baseboards holding the perimeter down.
The magic is in the locking system. Modern stuff uses what’s called a click-lock or drop-lock profile. You angle one plank into the next at about 20 degrees, then fold it flat. It snaps together with a satisfying pop. Once locked, that seam is never coming apart unless you physically shear the locking tab off. I’ve tried pulling planks apart by hand just to see — you can’t. Those little plastic tabs are stronger than you’d think.
LifeProof from Home Depot and Pergo from Lowe’s are the two brands I’ve used most. LifeProof’s rigid core LVP runs about $3.50/sq ft and the click mechanism is the tightest I’ve found. Pergo’s laminate is cheaper — around $2/sq ft — but the locking edges are more fragile. I snapped three tongue edges on my first Pergo install because I was hammering too hard with the tapping block. You learn to finesse it after the first box.
The underlayment matters way more than the flooring itself, honestly. I cheaped out once with the $0.30/sq ft blue foam and my downstairs sounded like a drum kit every time the dog walked across the room. Spent the extra dollar per square foot on cork underlayment the next time and the difference was night and day. Quiet. Solid-feeling. Worth every penny.
Installation Moves Fast Until It Doesn’t
I did a 600-square-foot basement last fall with LifeProof LVP. Started at 8 AM on a Saturday. By noon I had 400 square feet down and felt like a genius. Then I hit the staircase.
Stairs, doorways, floor vents, closet flanges — the small stuff will eat half your time. Cutting around a door jamb with an oscillating multi-tool so the plank slides under it, not just up to it. Undercutting the drywall so you have the right expansion gap without needing quarter-round everywhere. These are the details nobody tells you about when you’re watching the YouTube install video that makes it look like two hours of easy clicking.
You need a saw. Period. I don’t care what the box says about scoring and snapping — that works for the first ten planks and then you’re cutting a tiny L-shaped notch to fit around a heat register and you’re either going to use a jigsaw or you’re going to lose your mind. I use a jigsaw with a fine-tooth blade for the fiddly cuts and a miter saw for the straight cross-cuts. A circular saw works too, but the tear-out on the backside is worse if you’re cutting laminate.
Expansion gaps: leave a quarter inch minimum around every wall, every pipe, every fixed thing. I use the plastic spacers that come in the install kit, but honestly, cut-up scraps of the underlayment foam work just as well. Pull them out when you’re done and cover the gaps with baseboard or shoe molding. I skipped this in one hallway because I was tired, figured “it’s only ten feet, what could expand,” and two months later the middle of the hallway had a hump you could trip over.
Where Floating Floors Shine and Where They Suck
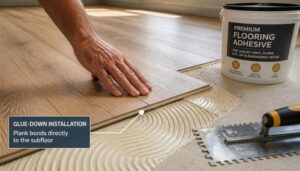
Concrete basements. This is their natural habitat. You can’t nail hardwood into concrete. You can glue it, but that’s a mess and you better hope the slab never gets wet. Floating over a vapor barrier underlayment is the right call almost every time in basement situations.
Over radiant heat, they’re great too. The floor can float above the heating system and expand and contract with the temperature cycles without pulling apart. Just check the product specs — LifeProof rates theirs for radiant up to 85°F, and you want to stay under that.
Where they suck: bathrooms with showers. I know the box says “waterproof.” It’s lying. It means the plank itself is waterproof — not the seams between planks. Water sits on a floating floor and eventually finds its way to the subfloor through the locking joints. I won’t put floating LVP in a full bath anymore. Tile or sheet vinyl only.
Also: heavy furniture on small feet. My daughter has an antique dresser with cast-iron legs. Each leg concentrates about 40 pounds into a one-inch circle. Those four spots dented the LVP permanently within a week. Furniture coasters are not optional — buy the wide plastic cups rated for at least 200 pounds each and use them on everything.
What I’d Do Differently If I Were Starting Tomorrow
I’d buy one extra box. Always. Returns are easier than hunting down a discontinued lot number three years later when you damage a plank. I’d also spend more on underlayment — it’s the difference between a floor that sounds hollow and one that feels like real hardwood under your feet. And I’d start every layout by measuring the room and doing the math so the first and last rows are equal width. Nothing looks worse than a beautiful floor with a two-inch strip on the far wall because you didn’t plan ahead.
Floating floors aren’t complicated. They are the most beginner-friendly flooring system that exists. But they’ll punish every shortcut you take, and you won’t notice until three months later when the temperature changes and the floor decides to remind you it needed a half-inch, not a quarter-inch, behind the couch.


Thanks for this breakdown. Bookmarked for my upcoming project — exactly what I needed.
Would you recommend this for a DIYer with moderate experience, or better to hire a pro?