
I thought pouring a 12×14 patio slab would be a Saturday morning project. I had two buddies, a rented mixer from Sunbelt, and 42 bags of Quikrete 5000. By Sunday night I was on my hands and knees with a margin trowel trying to fix a birdbath that had formed dead center. Ten years later, that slightly-off low spot still catches rainwater every time it drizzles. I see it from the kitchen window and remember exactly where I went wrong.
Here’s the thing about concrete slabs that YouTube doesn’t prepare you for: the concrete doesn’t care about your plans. It sets when it sets. If your grade is off by half an inch, that half inch becomes permanent at about the two-hour mark. If you forgot the wire mesh — which I did on that first patio — you’ll get a crack running corner to corner by the second winter. Mine showed up in February, right through the middle of what was supposed to be a smooth broom finish.
I’ve poured six slabs since then. A 24×24 garage floor, two shed pads, a front walkway, and a basement slab in my brother-in-law’s house. Every single one taught me something the last one didn’t. I’m not an engineer and I don’t own a concrete company. I’m just a guy who kept making mistakes until I stopped making them.
The Dirt Underneath Matters More Than the Concrete
Nobody talks about the base, but the base is everything. My first patio sat on about two inches of compacted gravel over undisturbed clay soil. Looked fine for six months. Then the frost heave in January lifted the whole slab about three-eighths of an inch on one corner and it never fully settled back down. Now there’s a lip you can catch your toe on. Classy.
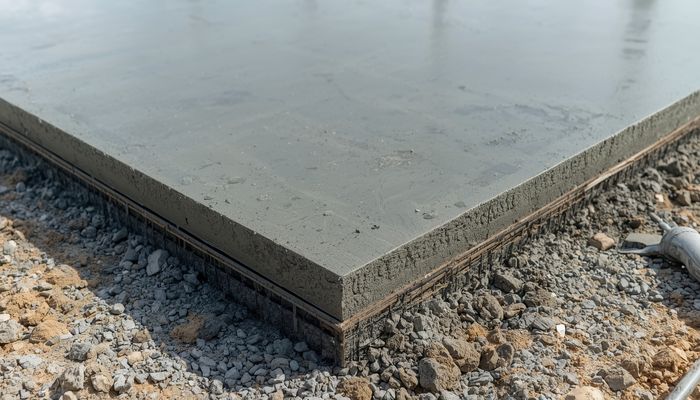
I use 4 to 6 inches of compacted crushed stone now, specifically 3/4-inch angular gravel — not pea gravel, not recycled concrete with fines. Angular stone locks together. Pea gravel rolls around like ball bearings. I rent a plate compactor from Home Depot, $65 for four hours, and I run it until my hands go numb. Then I run it again. You want that base so tight you bounce when you walk on it.
A 6-mil polyethylene vapor barrier goes on top of that gravel for any slab that’ll be indoors or under enclosed space. Roll it out, overlap seams 12 inches, tape them with sheathing tape. Skip this step on a basement slab and your flooring adhesive will fail from moisture wicking up through the concrete. I learned that one the hard way under a glue-down LVP job in 2019. The floor started peeling at the seams about eight months in. The moisture meter read 92% relative humidity in the slab. Should have been under 75%.
Thickness, Mix, and Why I Don’t Use the Cheap Stuff
Four inches is the minimum for anything you’ll walk on. That’s code in most places and it’s there for a reason. My garage slab is 6 inches thick with #4 rebar on 18-inch centers because I park a pickup truck on it and didn’t want cracks spidering out from the tire paths. The shed pads are 4 inches with welded wire mesh and they’re holding fine after five years.
On the mix: I use Quikrete 5000 for anything structural — garage floors, basement slabs, driveway sections. It hits 5,000 PSI after 28 days instead of the standard 3,500 to 4,000 you get from the red bag. Costs about a dollar more per 80-pound bag. For a 12×14 patio that’s maybe $42 extra. Worth it. For smaller stuff like shed pads or walkways, Sakrete 4000 or the standard Quikrete mix is fine.
An 80-pound bag covers about 0.6 square feet at 4 inches thick. Do the math before you go to the store. My 24×24 garage took just over 10 yards delivered by truck — roughly $1,800 for the concrete and another $400 for the pump truck because the backyard access was too tight for a chute. Bag mixing anything over about 100 square feet is a young man’s game. I’m 46. I call the redi-mix truck now and don’t apologize for it.
Cracks Are Going to Happen
There are two kinds of concrete: concrete that has cracked, and concrete that hasn’t cracked yet. The question isn’t whether it’ll crack — it’s whether the cracks happen where you decided they should happen instead of wherever the slab feels like it.
Control joints are your friend. I cut them with a diamond blade on a circular saw the day after the pour, as soon as the concrete is hard enough to walk on without leaving marks. For a 4-inch slab, cut one-quarter of the thickness deep — so about an inch. Space them at intervals roughly 2 to 3 times the slab thickness in feet. So for a 4-inch slab, a joint every 8 to 12 feet. On squares or rectangles, you want the panels as close to square as possible. Long skinny panels crack in the middle.
My garage slab has a control joint grid at 10-foot intervals. Twelve years in, every crack is inside a joint where I can’t see it. That’s a win.
If you’re pouring against an existing foundation or wall, use foam expansion joint material — it comes in rolls at any lumberyard for about $8. Keeps the slab from binding against the wall and popping up when it expands in summer heat.
Finishing: The Part Where Everything Goes Wrong
Concrete doesn’t wait. You pour it, you screed it with a straight 2×4 riding on the forms, you bull float it to push down the aggregate and bring up the cream, and then you wait. The waiting is the hard part. Too wet and the mag float sinks in. Too dry and you can’t close the surface.
Press your thumb into the surface. If it leaves about a quarter-inch depression with water beading around it, you’re in the window. Get on it with a magnesium float to smooth things out. Then, depending on the finish you want, you either trowel it smooth with a steel trowel or broom it for traction. Broom finish on anything exterior — smooth concrete turns into an ice rink when it rains. I run the broom in straight lines away from the house so water drains.
The curing part is where most DIYers check out mentally. Don’t. Concrete needs to stay moist for at least 7 days to reach design strength. I soak the slab with a hose and cover it with plastic sheeting, or I spray on a curing compound like Quikrete Acrylic Cure and Seal. About $25 a gallon, covers 200 to 300 square feet. Keeps the water in while the chemical reaction finishes. A slab that dries too fast on the surface will spall — the top layer flakes off in sheets. Seen it. Fixed it. Don’t want to do it again.
Leveling an Existing Slab
Sometimes you don’t need a new slab — you need to fix the one you have. I’ve leveled three basement slabs with self-leveling underlayment. The stuff pours like pancake batter and finds its own level. You prime the old concrete first with the matching primer (don’t skip this — the underlayment will debond without it), mix it in 5-gallon buckets with a drill and paddle mixer, pour it out, and spread it with a gauge rake. A 50-pound bag covers about 40 to 50 square feet at an eighth-inch thickness. Runs about $35 a bag.
My basement was out of level by almost three-quarters of an inch across 14 feet. Took 14 bags of LevelQuik RS. Total cost around $500 with primer and tools. Took me a Saturday. The floor is dead flat now and the LVP clicks together without a single soft spot.
I’m not going to wrap this up with some grand lesson. Concrete is just one of those things you learn by doing, and the doing is messy and physical and sometimes expensive in ways you didn’t expect. I still have the knee pads I wore on that first patio pour. They’re crusted with gray dust and the left one has a crack in the plastic cap. I keep them on a shelf in the garage. They remind me to check the grade twice and never pour on a Saturday afternoon when the sun is blazing and you’re racing a clock you can’t see.
Thanks for this breakdown. Bookmarked for my upcoming project — exactly what I needed.
For our flips, LVP gives the best ROI. Looks premium but costs reasonable. Buyers love it.