
I still remember the patch that broke me. Small hole in the hallway drywall, maybe 3 inches across — doorknob went through it during a move. I taped it, mudded it, sanded it, primed it, painted it. Looked perfect under my work light. The next morning, with sunlight streaming down the hallway, there it was: a visible hump right where the patch was. You could see it from twenty feet away. My wife walked past it for three weeks before I admitted defeat and redid the whole thing.
The problem, as a retired drywall guy at my local hardware store explained to me over the dusty aisles of Home Depot, was that I wasn’t feathering. I had spread the compound over the patch and stopped at the edges like I was frosting a cupcake. A clean, sharp border. Which is exactly wrong. He spent ten minutes drawing diagrams on a scrap of drywall with a carpenter’s pencil, and honestly, that conversation changed how I approach every repair I do.
Feathering is one of those things nobody explains well in tutorials. They say “feather the edges” like you’re supposed to know what that means. I didn’t. Now I do, and it’s the single biggest difference between work that looks DIY and work that looks invisible.
So What Is Feathering, Actually?
Feathering is making the edge of whatever material you’re applying — joint compound, paint, wood filler, caulk — so thin that it fades into nothing. Instead of stopping at a defined border, you taper the thickness down gradually until the material and the original surface are one and the same.
Think of it like a ramp. If you build a step (sharp edge), everyone trips on it. If you build a long, gradual ramp, nobody notices the transition. That’s feathering.
In drywall work, this means the joint compound over a patch is thickest at the center and gets progressively thinner as you move outward, until it’s essentially invisible 8 to 12 inches from the repair. Under paint, that ramp is undetectable. Light hits it evenly because there’s no edge to cast a shadow or catch a reflection.
In painting, feathering means tapering the paint at the edge of your brush stroke so there’s no hard line where wet paint meets dry paint. That’s what causes lap marks — those ugly stripes you see on poorly painted walls.
How I Feather Drywall Compound Now
After that hardware store conversation, I went home and re-did the hallway patch properly. Here’s the method I’ve used ever since:
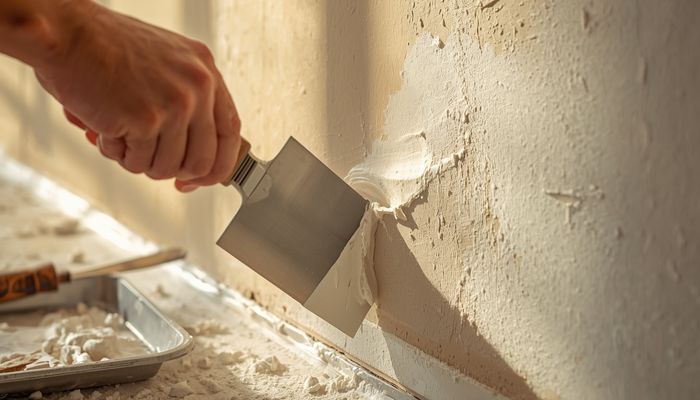
First coat goes on heavy — I fill the hole/crack/seam and cover the tape. I don’t worry much about feathering on this coat. I just make sure everything is filled and the tape is embedded. Let it dry, knock off any high spots with light sanding (120 grit on a sanding sponge).
Second coat is where feathering actually starts. I use a 6-inch knife for the center of the patch and then switch to a wider knife — 10 or 12 inches — for feathering the edges. I load the knife with compound and place it at the center of the repair. As I pull outward, I gradually lift the knife away from the wall. The pressure decreases, the compound layer gets thinner, and by the time I reach the outer edge of my work area, there’s barely any compound left.
The key insight: you’re not pushing compound to the edge. You’re pulling it away from the edge. The compound should go from about 1/8 inch thick at center to less than 1/32 inch at the outermost edge — essentially a film you can almost see through.
For a 3-inch patch, I feather out to about 10-12 inches total diameter. For larger repairs, I go wider — up to 18-24 inches. The wider the feather, the harder the transition is to see. You’re trading extra mud work for a better final result.
Third coat is a skim — a very thin layer over the whole feathered area with the compound thinned slightly with water. This fills the tiny imperfections and extends the taper even further. I use a 12-inch knife held almost flat against the wall. After sanding with 220 grit, the repair disappears.
I use USG Plus 3 (the blue lid) for final coats because it sands easier than all-purpose. The green lid stuff is better for taping. It matters more than you’d think — sanding all-purpose compound is like sanding concrete compared to the lightweight stuff.
Feathering Paint Without Lap Marks
Paint feathering is a different animal but the same principle — no hard edges. The problem with painting is that if you roll a section, stop, let it dry, and then roll the adjacent section, you get a visible line where they overlapped. The paint builds up at the overlap.
I learned to avoid this by working wet-on-wet. For walls, I roll the entire surface from top to bottom in one continuous session, never stopping mid-wall. For cutting in around trim and ceilings, I use a 2-inch angled brush (Purdy Clearcut, about $14) and feather the edge by lightening pressure as I pull away from the cut line. The paint film gets so thin at the edge that when I roll the main wall later, the roller blends right into it.
The real trick is speed and sequencing. I cut in one wall at a time, then immediately roll that wall before the cut-in paint dries. This is what pros mean by “keeping a wet edge.” If the cut-in dries before you roll, you get a picture-frame effect around the perimeter — a darker line where the brush applied thicker paint.
For touch-ups — say you’re painting over a patched nail hole — I use a technique a painter taught me: thin the paint slightly (about 5% water for latex), dab it on with a small brush, then immediately feather outward with a nearly dry brush. This blends the new paint into the surrounding area. It’s not perfect — touch-ups on walls that have aged more than a year almost never match exactly — but it’s way better than a hard-edged blob of fresh paint.
Feathering Wood Filler and Caulk
Same concept applies to wood repairs. When filling nail holes in trim, I overfill slightly with DAP Plastic Wood (the solvent-based stuff, not the lightweight spackle — it doesn’t shrink), let it dry, then sand flush. But for larger gouges and cracks, I feather the filler outward while it’s still wet using a flexible putty knife. Once dry, I sand with 180 then 220 grit, working from the center outward. The filler tapers into the existing wood and the stain or paint covers the transition.
With caulk — especially along baseboards or crown molding — I apply a thin bead, then immediately run a wet finger over it at a low angle, pressing the caulk into the crack while feathering the edges outward. The result is a smooth, concave line with no raised edges. A damp cloth cleans up the excess. I use Alex Plus for painted trim and Big Stretch for anything that moves seasonally (like window casings).
What Changed After I Learned to Feather
My patches stopped telegraphing through paint. That’s the big one. But beyond that, I started using less material — when you feather properly, you’re not piling on compound just to sand most of it off later. A good feathered coat needs minimal sanding, which means less dust, less time, and less cleanup.
I also stopped doing four and five coats on every patch. For a typical drywall repair, three coats with proper feathering is plenty. Two coats plus a skim coat usually gets it done. The first few repairs I ever did took five or six coats because I kept building up edges and sanding them down in this endless cycle of frustration.
The biggest mental shift was understanding that feathering isn’t about being delicate — it’s about being deliberate. You’re controlling pressure and angle. Once you get the feel for it, your hands just know when the knife is at the right angle and how much compound is under it. It takes practice, but the practice pays off fast.
If you’re learning, grab a scrap piece of drywall and just practice spreading compound with different pressures. Watch how the thickness changes as you change the angle of the knife. Do it until you can feel the transition. Then do a real patch somewhere inconspicuous — the back of a closet is perfect. Prime it, paint it, and walk past it at different times of day with different light. If you can’t find the patch, you’ve got it. If you can see it, feather wider next time.
That retired contractor in Home Depot was right. Feathering isn’t complicated — but it is everything.

Exactly the kind of practical info homeowners need. Clear, concise, and actionable.
I’ve tried this approach in my own home. Results were good but not miraculous. Solid option for the price point.