

The first time I tried to match orange peel texture, I made the wall look like it had some kind of skin condition. The can said “professional results in minutes.” I held it six inches from the wall and pulled the trigger. What came out looked less like orange peel and more like cottage cheese left in the sun. My wife walked in, stared at the patch job for a solid five seconds, and said, “We’re hiring someone, right?”
We didn’t hire someone. I burned through three more spray cans of Homax texture on scrap drywall until I figured out the distance, the pressure, and the wrist flick that makes it work. That was eight years ago, and I’ve since textured three rooms from bare drywall and patched more holes than I can count. Here’s what actually matters.
What Orange Peel Actually Is
Orange peel texture is exactly what it sounds like — a wall finish that looks like the surface of an orange. Tiny bumps, evenly spaced, each about the size of a grain of coarse salt. It’s not rough like sand finish. It’s not lumpy like popcorn ceiling. It’s the Goldilocks of wall textures: enough surface variation to hide drywall sins, subtle enough that nobody notices it unless they’re looking.
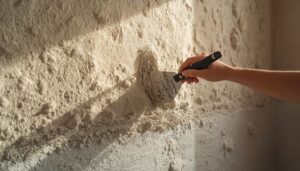
The material is joint compound thinned with water to the consistency of pancake batter. You spray it through a hopper gun connected to an air compressor, or you can use aerosol cans for small patches. USG makes the joint compound most pros use — the green-lid bucket is a staple on every jobsite I’ve seen. For spray cans, Homax and Dap both make decent orange peel products. The Homax Pro Grade can with the adjustable nozzle is worth the extra three dollars over the basic version.
In drywall finishing terms, orange peel is a Level 4 finish with texture applied. Level 5 is glass-smooth and costs significantly more because it requires skim-coating the entire wall. Most production builders use orange peel because it hides the difference between a good tape job and a great one. It forgives.
Learning the Spray Pattern
Nobody tells you that the hardest part of orange peel texture isn’t the mixing or the equipment. It’s the rhythm. You have to move the gun in overlapping passes at a consistent speed, maintaining the same distance from the wall the entire time. Get lazy for two seconds and you’ll have a heavy band of texture that looks like a stripe once it’s painted.
Here’s what works for me: set the compressor to about 30-35 PSI. Thin the joint compound until it’s runny enough to pour but thick enough to hold a peak for half a second before collapsing. Pour it through a paint strainer — little dried chunks of mud will ruin a spray pattern faster than anything. Fill the hopper about two-thirds full. Hold the gun 18 to 24 inches from the wall. Start spraying before the fan hits the wall and keep going until you’ve cleared the edge. Overlap each pass by about 50%.
You want the droplets to land and stay round. If they flatten out immediately, your mud is too thin. If they look like stalactites, it’s too thick. The sweet spot is when the droplets hold their shape but don’t tower above the surface.
On my first full room, I used a rental hopper gun from Home Depot — $28 for the day — and a borrowed pancake compressor. The gun clogged three times. I swore a lot. The second room went smoother. By the third, I could do a 12-by-12 room in about forty minutes of spraying, plus drying time. It’s not hard. It’s just unfamiliar until you’ve done it.
Repairs That Actually Blend In
Patching orange peel is its own skill. The spray cans — the Homax ones with the adjustable tip — work surprisingly well for holes up to about six inches. The trick nobody told me: spray past the patch onto the surrounding texture by a couple of inches. Feathering the edge is what makes the repair disappear. If you spray exactly within the borders of your patch, you’ll see a halo around it forever.
For larger repairs, I now own a small hopper gun — a $45 Graco knockoff from Amazon that has paid for itself several times over. Mix a small batch of mud in a clean bucket, strain it, spray the patch, let it dry, prime, and paint. Matching existing texture density is the hard part. I keep a scrap piece of drywall nearby and test-spray on it before hitting the actual wall. Adjust the air pressure or the nozzle until the test pattern matches, then go for it.
Sometimes the texture comes out too heavy. If that happens, don’t panic. Wait about five minutes — not fifteen, five — and drag a wide drywall knife lightly across the surface. You’ll flatten the peaks into a knockdown pattern. It won’t be orange peel anymore, but in a small patch area, nobody will notice the difference between knockdown and orange peel once it’s painted. I’ve done it. I’ve never been caught.
When Orange Peel Wins
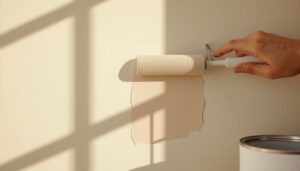
I have orange peel on every wall in my house except one — my office, which I paid extra for a Level 5 smooth finish. Here’s what I’ve learned: the smooth walls show every dent, every picture-hanging mistake, every place the kids bumped a chair. The orange peel walls don’t. In hallways, kids’ bedrooms, and the kitchen, the texture earns its keep daily.
Orange peel is also the easiest texture to clean. A damp microfiber cloth across an orange peel wall picks up fingerprints and cooking grease without snagging. Try that on knockdown or popcorn and you’ll either flatten the texture or leave bits of cloth embedded in it. For homes with children or dogs, this alone is worth choosing orange peel.
Cost-wise, having a pro texture a room runs about $200-400 depending on size and your market. DIY costs whatever the rental fee and mud run you — my last room was under $60 all-in. The spray cans for patches are $12-15 each and one can covers maybe 10 square feet of fresh texture.
When to Skip It
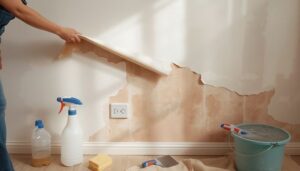
I don’t do orange peel in bathrooms anymore. Not after the guest bathroom ceiling started peeling — literally peeling — because moisture had worked its way behind the texture where the exhaust fan wasn’t doing its job. In high-humidity rooms, I now use a moisture-resistant primer first (Zinsser makes a good one called Mold Killing Primer), then texture, then a bathroom-specific paint with mildewcide. Kilz and Zinsser both make primers I trust for this.
I also wouldn’t texture walls you’re planning to wallpaper later. The bumps telegraph through all but the thickest wallpaper, and removing wallpaper from textured walls is a special kind of misery involving steam, scoring tools, and existential despair.
Smooth walls have their place. My office feels more polished. If I were selling a high-end home tomorrow, I’d probably skim-coat the main living areas smooth and leave orange peel in the bedrooms and hallways. There’s a reason builders haven’t abandoned it: it works, it’s affordable, and most people never think about it at all — which is exactly the point of a good wall finish.
I’ve tried this approach in my own home. Results were good but not miraculous. Solid option for the price point.
I’ve tried this approach in my own home. Results were good but not miraculous. Solid option for the price point.