
I Thought “Cutting In” Meant Painting Fast
My friend watched me paint a room once and said, “You know you’re supposed to cut in first, right?” I nodded like I knew what that meant. I did not. I had been painting for years — rolling walls, doing trim, the whole thing — and nobody had ever told me about cutting in. I was just rolling as close to the edges as I could and then going back with a brush to fix the spots the roller missed. It looked terrible. Every ceiling line was wavy. Every corner had paint bleeding onto the wrong surface.
Cutting in is painting a straight line with a brush where the roller can’t reach — the junction between the wall and ceiling, the wall and trim, the wall and adjacent walls. It’s the thing that separates a professional-looking paint job from one that looks like you did it yourself. Here’s how to actually do it.
The Brush Matters More Than You Think
I used cheap chip brushes for years because they were $2 and I could throw them away instead of cleaning them. A chip brush has bristles that are uneven, flared at the end, and impossible to get a straight line with. A good cutting-in brush has a specific shape: angled (sash) with a thin, tapered edge. The angle lets you see exactly where the bristles meet the surface.
I use a 2.5-inch Purdy Clearcut angled sash brush ($15). The synthetic bristles are finer at the tip than natural bristles, which gives you a sharper line. Natural bristles (china bristle) absorb water and go limp in latex paint — only use them with oil-based. For everything I paint now (which is all water-based), synthetic angled sash is the only brush I buy.
A good brush lasts years if you clean it properly. I keep a wire brush ($4) next to the sink — after painting, I work the bristles under running water to get the paint out of the heel (the base of the bristles where paint hides), then spin the brush between my palms to fling the water out, reshape the tip, and hang it to dry. A $15 brush cared for properly will outlast 50 chip brushes.
The Technique That Took Me Years to Learn
Load the brush, not the wall. Dip the brush about 1/3 of the way into the paint. Tap it against the side of the can — don’t wipe it, wiping removes too much paint and you’ll be going back to the can every six inches. You want the brush loaded enough to paint about 12-18 inches at a time.
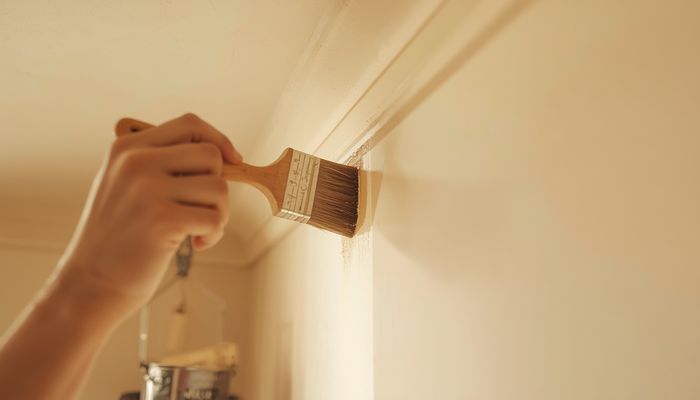
Start slightly away from the edge. Place the brush about 1/4-inch from the edge and paint a short horizontal stroke away from the corner. This lays down the paint. Then bring the brush back along the edge — the bristles will naturally form a straight line against the corner because of the angle. You’re not drawing a line. You’re guiding the paint to the edge.
The “wiggle” matters. As you approach the edge, wiggle the brush slightly — a side-to-side motion about 1/8-inch wide. This pushes paint into the corner without crossing it. It feels wrong when you first try it. It works.
Work in 12-18 inch sections. Paint a section, reload the brush, overlap the previous section by about an inch. The overlap blends the sections so you don’t get lap marks — visible lines where wet paint meets drying paint. This is especially important with fast-drying paints in dry climates.
The Cut Bucket I Wish I’d Bought Years Ago
Painting from a full gallon can is awkward — the can is heavy, the opening is small, and you inevitably get paint on the handle and then on your hand and then on everything you touch. A cut bucket (or “handy pail”) is a small plastic bucket with a handle and a magnet inside to hold your brush. They’re $8 at any paint store.
Pour about an inch of paint into the cut bucket. It’s light enough to carry up a ladder with one hand. The magnet holds the brush when you need both hands. The rim is wider than a gallon can so you can tap off excess paint more easily. This simple tool cut my cutting-in time by about 30% because I wasn’t climbing up and down the ladder to reload.
My friend was right about one thing: cut in first, then roll. The roller will cover the inch-wide band you created, blending the brushed areas with the rolled areas. If you roll first and cut in second, the brushed areas will have a different texture (more stipple) and the edge will be visible. I learned this the hard way in my dining room. The ceiling line still looks slightly different if you know where to look. I know where to look.


Exactly the kind of practical info homeowners need. Clear, concise, and actionable.
I’ve tried this approach in my own home. Results were good but not miraculous. Solid option for the price point.