
I still remember standing in my freshly painted living room at 11pm on a Sunday, staring at what looked like a zebra convention. Dark streaks everywhere. Some patches glossy, some dead flat. My wife walked in, took one look, and said the four most devastating words a DIY painter can hear: “Did you mess up?”
Yes. Yes I did.
I’d spent $240 on Benjamin Moore Regal Select in Edgecomb Gray, spent six hours cutting in and rolling, and the result looked worse than the scuffed-up builder-grade beige I was covering. What I didn’t know — and what nobody told me at the Home Depot paint counter — was that I’d skipped the single most important step between spraying the walls and admiring my work: back-rolling.
That was three houses and roughly 4,000 square feet of painted walls ago. Now I back-roll everything, and I’ve made peace with the fact that I learned this lesson the expensive way. Here’s what I wish someone had told me before I picked up my first Purdy White Dove roller.
So What Actually Is Back-Rolling?
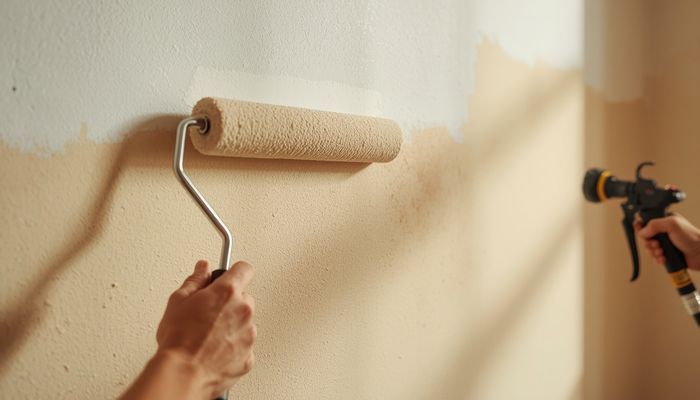
It’s stupidly simple. After you apply paint — whether you’re spraying or rolling — you immediately go back over that same wet section with a dry (or very lightly damp) roller. No new paint on the roller. You’re just working the paint that’s already there into the surface.
The magic happens in about 30 seconds. Your dry roller pushes paint into every microscopic pore of the drywall or texture, breaks up the tiny air bubbles that sprayers love to create, and evens out the sheen so you don’t get those weird zebra stripes I became intimately familiar with.
Think of it like rubbing moisturizer into your skin instead of just smearing it on top and walking away. One soaks in. The other sits there looking greasy and uneven. Same principle.
The Day I Figured Out Why My Paint Kept Peeling
About a year after my zebra-wall incident, I was repainting a bathroom — this time with a Graco Magnum X5 sprayer I’d bought used on Facebook Marketplace for $180. I thought I was hot stuff. Sprayed the whole room in 20 minutes flat. Looked beautiful wet. Came back two hours later and it looked… dusty. Thin. Wrong.
Three months later, paint started peeling off in sheets around the shower area.
What I eventually learned: when you spray without back-rolling, the paint basically sits on the surface like a film. It never mechanically bonds with the substrate. So the first time humidity or temperature changes hit it, that film separates. Back-rolling literally forces the paint molecules into the surface. You’re creating a mechanical bond, not just a chemical one.
I had to sand the entire bathroom down to bare drywall, prime with Kilz Premium ($22/gallon at Lowe’s), and repaint. This time I back-rolled every single section. That was four years ago. The paint still looks new.
When You Actually Need to Back-Roll (And When You’re Wasting Your Time)
After enough weekends covered in paint, here’s my honest take:
Absolutely back-roll when:
You’re spraying. Full stop. Every pro I’ve ever talked to back-rolls after spraying, including the guy who painted my parents’ house and charges $85/hour. The only exception is cabinet spraying with a fine finish tip, and even then, some guys still knock it down with a foam mini-roller.
You’re painting new drywall. Fresh drywall is like a sponge — some spots soak up more paint than others. Without back-rolling, you get “flashing” where the mudded seams look different from the bare drywall paper. Ask me how I know.
You’re painting anything with texture. Orange peel, knockdown, popcorn ceilings (bless you if you’re tackling those). A regular roller just skims the high points. Back-rolling with a 3/4-inch nap or even a 1-inch nap forces paint into the valleys.
You can probably skip it when:
You’re putting a second coat on a smooth wall that’s already been back-rolled once. At that point you’re just adding coverage, and a standard roll-out works fine. Also, if you’re using something like Benjamin Moore Aura or Sherwin-Williams Emerald — these are self-leveling paints that forgive a lot of sins. But I still give them a quick back-roll because I’m paranoid now.
Tools I Actually Use, Not Just Recommend From Some List
After burning through probably a dozen roller covers, here’s what’s lived in my garage long-term:
- Wooster Pro/Doo-Z roller frame ($12 at Ace). Nothing special, but the cage doesn’t slip and it’s survived being dropped off a 6-foot ladder twice.
- Purdy White Dove 1/2-inch nap for smooth walls. These are about $8 each and I can usually get two rooms out of one cover if I wrap it in plastic between coats.
- Wooster Super/Fab 3/4-inch nap for anything with texture. Costs maybe $9. The woven fabric doesn’t shed like the cheap blue ones.
- A Wooster Sherlock 4-to-8-foot extension pole. $28 at Home Depot. The twist-lock is garbage — it slips if you push hard — but the price is right. If I were doing this professionally I’d buy the Purdy Power Lock pole for $55.
One thing nobody talks about: don’t use a wet roller for back-rolling. If your roller cover has been sitting in water or paint, squeeze it out until it’s just barely damp. You’re redistributing paint that’s already on the wall, not adding more. I learned this after basically doubling my paint usage on one wall because my back-roll roller was saturated.
The Ceiling Job That Almost Broke Me
Last summer I painted my basement ceiling — exposed floor joists, ductwork, the whole industrial look. Rented a Graco sprayer from Home Depot for $85/day. Figured I’d knock it out in three hours.
Eight hours later I was still going, covered in black overspray, arms screaming from holding a roller on an extension pole over my head. But here’s the thing: I back-rolled every single joist with a 3/4-inch nap roller after spraying, and the coverage was perfect. My neighbor did the same project a month earlier without back-rolling and told me he had to do three coats to get even coverage. I did it in one.
His ceiling also has those annoying little cobweb-like strings of paint in the corners from the sprayer. Back-rolling knocks those down before they dry.
What Actually Matters vs. What the Internet Lies About
You’ll read a lot of advice about “working in 4-foot sections” and “always maintaining a wet edge.” That’s the ideal world. In reality, if you’re working solo in a 12×14 bedroom, you’re going to lose your wet edge sometimes. It’s fine. Paint doesn’t cure in 45 seconds despite what the can says — especially if you’re using latex in a climate-controlled house.
What actually matters is back-rolling consistently. Even if you have to go back 2-3 minutes later (not 20 minutes, but 2-3 is fine), a quick pass with a dry roller will blend things out. I’ve done it probably 50 times and never had a problem.
The one thing I’ll never do again: back-roll with the same roller I’m applying paint with. You end up loading up too much paint and making a mess. Keep a dedicated dry roller on a separate frame. It’s an extra $20 for the frame and cover and it saves so much aggravation.
If I could go back and tell my past self one thing about painting, it’d be this: whatever you’re spending on the paint itself, budget an extra $30 for a good back-rolling setup and an extra hour of time. The difference between a paint job that looks like you did it yourself and one that looks like you paid someone isn’t skill — it’s whether you back-rolled.


Just spent 3 hours installing T-molding between my tile and new laminate. This article would’ve saved me an hour of YouTube confusion.
Great breakdown of engineered vs solid hardwood. I’ve been debating which way to go for our renovation and this helped make up my mind.