
For two years, there was a 3/8-inch gap between my kitchen tile and living room hardwood. Not a big deal, right? Just a little crack in the floor. Except that gap was exactly where every single person walking through our house naturally stepped. And every single person — including our 72-year-old neighbor who came over for dinner — caught their toe on it at least once.
My wife called it “the ankle breaker.” I called it “I’ll fix it next weekend.” For 104 weekends.
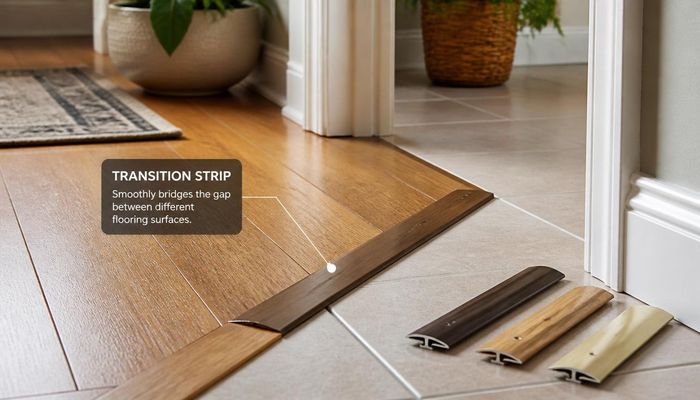
What finally forced my hand wasn’t the tripping. It was vacuuming. The edge of my carpet in the adjacent hallway had started fraying where it met the laminate, and I realized I was about to turn a $12 problem into a “replace the carpet in the entire hallway” problem. That’s what transition strips are actually for — not just making things look pretty, but stopping small installation gaps from becoming expensive disasters.
The Day I Stood in the Flooring Aisle Looking Completely Lost
I walked into Floor & Decor thinking I needed “one of those metal strip things.” Twenty minutes later I was sitting on the floor in the transition strip aisle, surrounded by T-moldings and reducers and end caps and stair noses, with no idea what any of them actually did.
The employee who finally helped me — a guy named Marcus who’d been installing floors for 15 years — explained it in about 90 seconds, which is all this really needs:
T-molding: For two floors of the SAME height. The flat part sits on top of both floors, and the stem of the “T” drops into the gap. I used this between my living room hardwood and the hallway laminate because they’re both 3/8-inch thick.
Reducer strip: For when one floor is HIGHER than the other. It has a sloped profile that creates a gentle ramp. This is what I needed between my kitchen tile (1/2-inch thick with thinset) and the living room hardwood (3/8-inch). The reducer bridges that height difference so you don’t stub your toe.
End cap: Used where flooring meets a vertical surface like a sliding door track, fireplace hearth, or carpet that’s the same height. It’s basically a squared-off transition that covers the raw edge.
Stair nose: For the front edge of stairs. Rounded on one side, flat on the other. Not what I needed, but now I know.
Carpet-to-tile transition: This one has teeth — literally a metal channel with little gripper spikes on the carpet side that hold the carpet edge in place while the flat side sits on the tile. I used this between our hallway carpet and the bathroom tile.
How I Installed My First Transition Strip (And the Dumb Thing I Did Wrong)
The actual installation is not complicated, but I still managed to mess it up the first time.
My kitchen-to-living-room reducer was a 72-inch piece of oak that I bought unfinished from Home Depot for $14. I picked up a small can of Minwax Golden Oak stain ($9) and some water-based polyurethane ($12) to match our existing hardwood. Stained it in the garage, two coats of poly, let it cure overnight.
The mistake I made: I measured the doorway width (36 inches), cut the strip to exactly 36 inches with my miter saw, and discovered it was about 1/8-inch too short. You need to leave a tiny expansion gap on each end — maybe 1/16 to 1/8 inch — but NOT more than the width of your baseboard or quarter-round will cover. I ended up having to buy a second strip.
Second attempt, I cut it to 35-7/8 inches. Perfect.
The track system most modern transition strips use is brilliant. You screw a metal or plastic channel into the subfloor (in the gap between the two floor types), then the decorative strip snaps down into the track. No visible screw holes. If you ever need to replace it, you just pry it up and snap a new one in. I used a strip from the M-D Building Products line — they’re available at every Home Depot and Lowe’s, and their U-track system is used by a bunch of different manufacturers.
What I Used and What I’d Buy Again
For the kitchen-to-living-room job: a solid oak reducer strip from Home Depot’s in-house brand. $14 for a 72-inch piece. The quality was fine — it’s oak, it’s straight, it does what oak does. I wouldn’t overcomplicate this. You don’t need exotic hardwood for a transition.
For the hallway carpet-to-tile transition: a Zamma metal carpet bar in brushed nickel, $11 on Amazon. It has a gripper edge on one side that holds the carpet and a flat flange on the tile side. Installation took maybe 15 minutes. Two years later the carpet edge still looks brand new.
For the laminate-to-laminate T-molding (closet doorway): I used the matching Pergo T-molding that came from the same line as the flooring. This is the one case where I’d strongly recommend buying the manufacturer-matched strip — third-party T-moldings often have a slightly different profile or color and they just look off. The Pergo strip was $24 for a 78-inch piece. Steep for what it is, but it matches perfectly.
One tool recommendation that nobody talks about: get a flush-cut oscillating saw blade for your multi-tool. When you need to undercut door jambs or trim for a transition strip to slide under, a regular saw can’t get flush to the floor. A $12 Dremel or Diablo carbide flush-cut blade on an oscillating tool makes this job take 30 seconds instead of 20 minutes of frustration with a chisel.
The Thing Most People Forget About Transition Strips
Here’s something the packaging doesn’t tell you: you NEED the expansion gap under that strip. Flooring expands and contracts with temperature and humidity changes. Laminate especially — my living room floor moves almost 1/4 inch between winter (when the furnace dries everything out) and summer (when it’s 80% humidity). If you butt your transition strip tight against both floor edges with no room for movement, your floor WILL buckle.
The gap under the T-molding or reducer should be roughly 1/4 to 3/8 inch. The strip covers it visually, but the floors can still move independently underneath. That’s the whole point.
I also learned that you need to fasten the track into the SUBFLOOR, not into the flooring material itself. If you screw the track into your floating laminate, you’ve just anchored a floating floor — which defeats the entire purpose. The track screws go through the gap and into the plywood or OSB below. This applies to nail-down hardwood too.
What I’d Do Differently Now
If I were doing my whole house over again, I’d buy all my transition strips at once, from the same brand line, and stain or finish them all together. I ended up with three different finishes because I bought them one at a time over two years. The reducer in the kitchen doorway has a slightly warmer tone than the T-molding in the hallway. Nobody notices except me, but I notice every single day.
I’d also pay more attention to the height measurement. The reducer I bought was rated for 1/4-inch to 1/2-inch height difference, and my actual difference was about 5/16-inch — right in range. But if your height difference is, say, 3/4-inch, you need a different style entirely, possibly a threshold or a custom reducer. Measure with an actual ruler or calipers, not the “yeah that looks about right” method I used the first time.
Honestly, the whole transition strip thing is one of those projects where you kick yourself afterward for waiting so long. It cost me under $50 total for three doorways, took maybe two hours including the staining and finishing, and eliminated the most annoying thing about our house. If you’ve got a gap between floors that’s been bugging you — just fix it. The supplies are cheap, the skills required are minimal, and your toes will thank you.


I’ve tried this approach in my own home. Results were good but not miraculous. Solid option for the price point.
Really helpful article. I’ve been researching this for weeks and this put everything together clearly.