
I paid $900 for a DIY spray foam kit and ruined my rim joists. This was three winters ago. I’d been reading about how spray foam was the best thing you could do for an old house — air sealing, insulation, vapor barrier all in one shot. The basement was cold, the floors above were freezing, and I figured: how hard could it be?
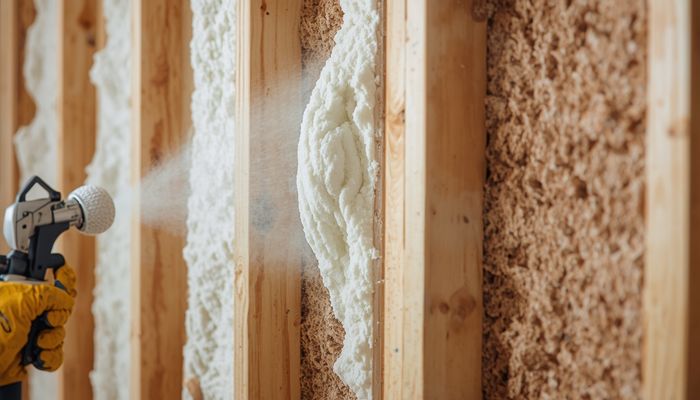
The kit was a Froth-Pak 620. Two metal tanks strapped together, a bunch of nozzle tips, a gun with about 15 feet of hose. Six hundred and twenty board feet of closed-cell foam, according to the label. I watched six YouTube videos, put on the Tyvek suit and respirator they included, and got to work.
Twenty minutes in, the foam started coming out wrong. Instead of that satisfying even fan pattern you see in the videos, it was spitting — wet in some spots, dry and crumbly in others. I’d shake the tanks like the instructions said, swap nozzles, adjust the gun. Nothing helped. By the time I gave up, I had about 40 square feet of lumpy, half-cured yellow foam covering my rim joists. It looked like someone had sprayed expired whipped cream into the cavities and walked away.
The smell was the worst part. That chemical off-gassing odor hung in the basement for four days. My wife refused to go downstairs. I had to set up box fans in the windows in January. The foam never fully cured in some spots — it stayed tacky and soft. In other spots, it over-expanded so badly it was pushing the fiberglass insulation out of the adjacent bays.
I spent a full weekend with a chisel, a hammer, and a oscillating multi-tool cutting every bit of it out. Two contractor bags full of failed foam. Nine hundred dollars in the trash.
I called a professional after that. Guy named Mike, been spraying foam for 17 years. He walked through the basement, looked at my handiwork, and laughed — not in a mean way, but the way someone laughs when they’ve seen this exact thing fifty times.
“The tanks need to be at exactly 75 to 85 degrees,” he said. “Not room temperature. Tank temperature. That means keeping them inside for at least 24 hours before you spray. Your basement was probably 58 degrees. The B-side gets thick when it’s cold and the mixing ratio goes to hell.”
He also pointed out that the Froth-Pak kits use a different chemical formulation than professional rigs. DIY kits rely on a mechanical mixing tip that’s just not as precise as the high-pressure impingement mixing that pro guns do. You’re basically hoping two chemicals meet in roughly the right proportions at the nozzle. Professionals run at 1,200 to 1,500 PSI with heated hoses and exact 1:1 ratio control.
Mike’s crew came back the following week. They sprayed 2 inches of closed-cell foam on all the rim joists in about three hours. The foam was creamy, consistent, and expanded perfectly into every crack. It cured hard within minutes. The basement hasn’t smelled like chemicals since day two. My heating bill dropped by about $80 a month that winter — I tracked it.
The cost? $1,400 for the pro job versus my $900 disaster kit. I effectively paid $2,300 total because I was too stubborn to hire someone the first time.
Closed-Cell vs Open-Cell: What I Should Have Understood First
Before you buy anything, you need to know which type of spray foam you’re dealing with. They are not interchangeable.
Closed-cell spray foam is the dense stuff. It weighs about 1.5 to 2 pounds per cubic foot. The cells inside are fully enclosed bubbles, which means water can’t pass through and air can’t either. It has an R-value of roughly R-6.5 to R-7 per inch. At 2 inches, you get about R-13 to R-14 plus a built-in vapor barrier. That’s why Mike used it on my rim joists — you get insulation and moisture control in one application. It also adds structural strength. Closed-cell foam can increase wall racking strength by 200 to 300 percent, which is why it’s commonly used in hurricane zones.
The downside: it’s expensive. Professionally installed closed-cell runs $1.50 to $2.50 per board foot. A board foot is one square foot at one inch thick. So insulating a 100-square-foot rim joist area at 2 inches costs somewhere around $300 to $500 for the foam alone, not counting prep and labor.
Open-cell spray foam is the lighter, softer cousin. About half a pound per cubic foot. The cells are broken — air and moisture vapor can move through it. It has an R-value of around R-3.5 to R-4 per inch, so you need roughly twice the thickness to match closed-cell’s thermal performance. At 3.5 inches, open-cell hits about R-13.
Open-cell is cheaper — typically $0.50 to $1.00 per board foot installed. It’s great for interior walls where you want sound deadening (it’s much better at absorbing noise than closed-cell) and don’t need a vapor barrier. It’s also more forgiving during installation because it expands more slowly and fills irregular cavities more gently.
But here’s where people screw up: they use open-cell in a basement or crawl space because it’s cheaper, and moisture migrates right through it and condenses on the cold foundation wall behind. That’s exactly how you grow mold inside your walls. Open-cell should never be used against concrete or in any application where it could get wet and stay wet.
Where Spray Foam Actually Belongs
After my disaster and the subsequent pro job, I’ve used spray foam in three houses now. Here’s where it genuinely makes sense:
Rim joists and band boards. This is the lowest-risk, highest-reward spray foam application. Rim joists are the perimeter framing between floors where the floor joists meet the exterior wall. They’re almost never properly insulated in older homes. Two inches of closed-cell foam seals the air leaks, insulates, and blocks moisture — and it’s relatively affordable because you’re not doing entire walls.
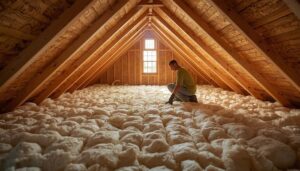
Attic roof decks in unvented assemblies. If you have ductwork in your attic and you live somewhere hot, spraying closed-cell foam on the underside of the roof deck brings the attic into the conditioned envelope. Your air handler is no longer sitting in 140-degree heat. This is the “hot roof” approach. I had this done on a 1960s ranch and my summer AC bill dropped 40 percent. The catch: it’s expensive. Five inches of closed-cell on a 1,500-square-foot attic can run $8,000 to $12,000.
Crawl space encapsulation. Closed-cell on crawl space walls, combined with a ground vapor barrier (I use Stego Crawl, 15-mil), turns a damp, nasty crawl into a dry mini-basement. You need to seal the vents and condition the space though. Half measures don’t work.
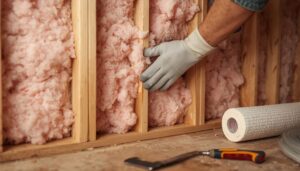
Where I wouldn’t use it: exterior walls in an existing home unless you’re gutting to the studs. The mess and cost of stripping drywall just to spray foam rarely pencils out. Fiberglass or dense-pack cellulose does fine in walls. Also, never use open-cell against any surface that could get wet — basement walls, crawl space walls below grade, anywhere near a foundation leak.
What I Know Now
If you’re considering spray foam, skip the DIY kit. The math doesn’t work. Between the tank temperature sensitivity, the imprecise mixing, the limited coverage (a 620 board-foot kit realistically covers maybe 400 to 500), and the risk of an uncured mess, the $900 kit is not the bargain it looks like. A pro job on rim joists costs $1,200 to $1,800 and it gets done in an afternoon with a warranty.
I keep a can of Great Stuff Pro foam — the gun-applied kind, not the disposable straw cans — in my workshop for small gaps and penetrations. That’s the right DIY spray foam. For anything bigger than a crack around a pipe, I call Mike.
Spray foam is incredible stuff when it’s applied correctly. It’s also unforgiving. The difference between a perfect install and a disaster is about four degrees of tank temperature and a thousand PSI of spray pressure. Don’t learn that the way I did.


Can insulation be added without tearing down walls? Our house is finished and we don’t want to open everything up.
We always upgrade insulation in flips. The cost is minimal and it’s a big checkbox for home inspectors.