TL;DR: Installing a heat pump can cut your heating and cooling costs by 30-50% compared to traditional HVAC systems. This guide covers a mini-split ductless heat pump installation for a single room or zone—a manageable DIY project for confident homeowners. You’ll need about 12-20 hours, $1,500-$3,000 in materials, and basic electrical and plumbing skills. Follow the steps carefully to avoid costly mistakes and enjoy year-round comfort with lower energy bills.
What You’ll Need
| Category | Item | Estimated Cost |
|---|---|---|
| Tools | Cordless drill with bits (masonry, wood, metal) | $50–$120 (if buying new) |
| Tools | Level (4-foot or laser level) | $15–$40 |
| Tools | Hole saw kit (2.5–3.5 inch for line set) | $20–$50 |
| Tools | Vacuum pump (1.5 CFM or higher) with manifold gauge set | $80–$150 (rental available at ~$30/day) |
| Tools | Torque wrench (for flare nuts) | $25–$60 |
| Tools | Flaring tool kit (for copper lines) | $20–$40 |
| Tools | Multimeter (for electrical testing) | $20–$50 |
| Tools | Pliers, wrenches, tubing cutter, tape measure | $20–$60 (assume you have some) |
| Materials | Mini-split heat pump kit (indoor unit, outdoor unit, line set, wiring) | $800–$1,800 (depends on BTU size) |
| Materials | Mounting bracket for outdoor unit | $30–$60 |
| Materials | Electrical disconnect box and 20-amp breaker | $20–$40 |
| Materials | 10/2 or 12/2 outdoor-rated electrical wire (50 ft) | $30–$60 |
| Materials | Insulation for refrigerant lines (foam wrap) | $10–$20 |
| Materials | PVC conduit and connectors (for electrical) | $15–$30 |
| Materials | Drain hose, cable ties, mounting screws, sealant | $15–$25 |
| Total Estimated Cost | $1,500–$3,000 |
How Long Does This Take?
Plan for 12–20 hours total for a single-zone installation. Here’s the breakdown:
- Planning and prep: 1–2 hours (measurements, reading manual)
- Mounting indoor unit: 1–2 hours
- Drilling hole and running line set: 2–3 hours
- Mounting outdoor unit: 1–2 hours
- Connecting refrigerant lines: 1–2 hours (including flaring)
- Electrical connections: 2–4 hours (including breaker install)
- Vacuuming and leak testing: 1–2 hours
- Final setup and testing: 1–2 hours
Safety First
WARNING: Heat pump installation involves high-voltage electricity (240V) and pressurized refrigerant. Mishandling can cause serious injury, fire, or equipment damage. Follow these precautions strictly:
- Turn off main power at the breaker panel before working on any electrical connections. Verify with a multimeter that power is off.
- Wear safety glasses and gloves when drilling, cutting, or handling refrigerant lines.
- Never work alone when lifting heavy outdoor units (50–80 lbs). Use a helper or mechanical lift.
- Do not kink or puncture refrigerant lines—they contain high-pressure gas that can cause frostbite or explosion.
- Use a vacuum pump to remove moisture and air from the lines before releasing refrigerant. Skipping this step destroys the compressor.
- Check local codes—many areas require a licensed electrician for hardwiring. If unsure, hire a pro for the electrical portion.
- Read the manufacturer’s manual completely before starting. All mini-split kits vary slightly.
Step-by-Step Instructions
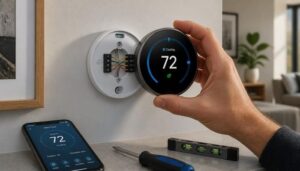
- Choose the location for your indoor unit (air handler). Mount it on an interior wall at least 6 inches from the ceiling and 6 inches from side walls. Ensure no obstructions (curtains, furniture) block airflow. Use a stud finder to locate wall studs—mount the bracket securely into studs with lag bolts. Level the bracket perfectly. Time: 30–45 minutes.
- Drill a 3-inch hole through the exterior wall for the refrigerant line set, drain hose, and wiring. Use a hole saw from inside, angled slightly downward (1/4 inch per foot) so water drains outside. Remove insulation and debris. Insert a wall sleeve (provided with kit) to protect the lines. Time: 15–30 minutes. Wear a dust mask and eye protection.
- Mount the outdoor unit (condenser) on a concrete pad or wall bracket. Place it on a level, vibration-free surface at least 12 inches from the house wall. If using a wall bracket, secure it to studs or masonry anchors rated for 100+ lbs. Set the outdoor unit on the bracket and bolt it down. Time: 30–60 minutes. Get a helper—units are heavy.
- Run the refrigerant line set from indoor to outdoor unit. Uncoil the pre-insulated copper lines carefully—avoid kinks. Feed them through the wall hole from inside to outside. Leave 3–4 feet of extra line at both ends for connections. Wrap any exposed lines with foam insulation tape. Time: 20–40 minutes.
- Connect the refrigerant lines to the indoor unit. Use the flaring tool to create a clean flare on each copper tube end (if not pre-flared). Tighten the flare nuts by hand, then use a torque wrench to the manufacturer’s specification (usually 30–40 ft-lbs). Overtightening can crack the flare; undertightening causes leaks. Time: 30–60 minutes.
- Connect the drain hose and control wiring. Attach the drain hose to the indoor unit’s drain port; route it through the wall hole and downward outside. Connect the communication cable (usually 4-wire) from indoor to outdoor unit per the wiring diagram. Secure all connections with cable ties. Time: 20–30 minutes.
- Install the electrical service for the outdoor unit. Run 10/2 or 12/2 outdoor-rated wire from a new 20-amp double-pole breaker in your main panel to a disconnect box near the outdoor unit. Then run wire from the disconnect to the unit’s electrical terminals. This step requires shutting off main power. If you’re not comfortable with electrical work, hire a licensed electrician. Time: 1–3 hours.
- Connect the refrigerant lines to the outdoor unit. Repeat the flaring and torquing process for the outdoor unit’s service valves. Leave the valve caps closed for now. Time: 20–40 minutes.
- Vacuum the refrigerant lines. Attach the vacuum pump and manifold gauge set to the service port on the outdoor unit. Run the vacuum pump for at least 30 minutes (or until the gauge reads below 500 microns). Close the valve on the gauge set, then turn off the pump. Wait 10 minutes—if the pressure rises, you have a leak. Never skip this step—moisture will destroy the compressor. Time: 45–60 minutes.
- Release the refrigerant. Open the service valves on the outdoor unit (both liquid and gas lines) slowly using a hex key. You’ll hear a hiss as refrigerant flows into the lines. Check all flare connections with a leak detector or soapy water for bubbles. Time: 10–15 minutes.
- Test the system. Turn on the breaker and the disconnect switch. Set the indoor unit to cool mode at 60°F. Wait 5–10 minutes—cold air should blow from the unit. Check the outdoor unit fan is spinning. Listen for unusual noises. Let it run for 30 minutes to confirm proper operation. Time: 30–45 minutes.
- Seal the wall hole and clean up. Use expanding foam or silicone caulk to seal the hole around the line set both inside and outside. Insulate any exposed copper lines outside with UV-resistant foam wrap. Secure all cables with clips. Time: 15–30 minutes.
Common Mistakes to Avoid
- Overtightening flare nuts. This cracks the flare, causing refrigerant leaks. Use a torque wrench set to the manufacturer’s spec (usually 30–40 ft-lbs).
- Skipping the vacuum step. Air and moisture in the lines cause ice crystals, corrosion, and compressor failure. Always vacuum to below 500 microns.
- Improper line set bending. Kinking the copper lines restricts refrigerant flow and damages the system. Use a tubing bender for tight turns, and never bend sharper than a 6-inch radius.
- Mounting the indoor unit unlevel. If the unit tilts, condensation won’t drain properly, causing water damage. Use a level and shim if needed.
- Undersizing the electrical circuit. Using too small a wire or breaker can cause overheating and fire. Follow the manufacturer’s ampacity requirements exactly (usually 20-amp breaker with 12 AWG wire).
When to Call a Professional
While this guide is for confident DIYers, some situations require a licensed HVAC technician or electrician:
- You need to run new electrical from the main panel and have no experience with 240V circuits. Incorrect wiring can cause electrocution or fire.
- Your home has a complex layout (e.g., multiple floors, brick or stone exterior) requiring specialized drilling or line routing.
- You’re installing a multi-zone system (2+ indoor units). The refrigerant charging and line set balancing is more complex and often requires professional tools.
- You encounter a refrigerant leak after installation. Repairing leaks and recharging refrigerant requires EPA certification (in the US) and specialized recovery equipment.
- Your local building code requires permits and licensed installation for heat pumps. Check with your city or county before starting.
If any step feels unsafe or beyond your skill level, stop and call a pro. A professional installation typically costs $3,000–$6,000 for a single-zone system, but includes warranty and peace of mind.
Frequently Asked Questions
- Q: How much can I save on energy bills with a heat pump?
A: Most homeowners save 30–50% on heating and cooling costs compared to electric resistance heaters or older air conditioners. For a typical home, that’s $300–$800 per year in savings. - Q: Do I need a permit to install a heat pump?
A: Yes, in most jurisdictions. Electrical work, structural modifications (drilling holes), and refrigerant handling often require permits. Check with your local building department. Failing to get permits can void your home insurance. - Q: Can I install a heat pump myself if I have no HVAC experience?
A: Only if you’re confident with electrical work, basic plumbing (flaring copper), and following detailed instructions. Many DIYers succeed with mini-splits, but the learning curve is steep. Start with a single-zone unit in a garage or basement. - Q: What size heat pump do I need for my room?
A: For a single room, use 20 BTUs per square foot. A 12,000 BTU unit (1 ton) covers about 500–600 sq ft. Oversizing causes short cycling and poor dehumidification; undersizing runs constantly. For a whole house, hire a pro for a Manual J load calculation. - Q: How long does a heat pump last?
A: Mini-split heat pumps typically last 12–20 years with proper maintenance. Clean filters monthly, keep outdoor coils free of debris, and schedule professional checkups every 2–3 years. Learn more about heat pump maintenance tips.
For more guidance, check out our related guides: How to Choose the Right Heat Pump Size, Mini-Split vs Central Heat Pump: Which Is Better?, and Heat Pump Rebates and Tax Credits in 2025. Also read Common HVAC Installation Mistakes to Avoid and DIY Electrical Safety for Homeowners.