TL;DR: Replacing a standard electrical outlet is a simple, safe DIY project if you have the right tools and follow proper precautions. You need a voltage tester, screwdrivers, wire strippers, and a new outlet. This guide covers every tool, step, and safety measure so you can complete the job in 30–45 minutes for under $30.
What You’ll Need
Before starting, gather all tools and materials. The table below lists everything required, with estimated costs from major home improvement stores like Home Depot or Lowe’s.
| Tool / Material | Purpose | Estimated Cost |
|---|---|---|
| Non-contact voltage tester | Verify power is off before touching wires | $10 – $20 |
| Flathead screwdriver (medium) | Remove outlet cover plate and terminal screws | $5 – $10 |
| Phillips-head screwdriver (#2) | Remove outlet mounting screws | $5 – $10 |
| Wire strippers (adjustable or 14/12 AWG) | Strip insulation from wire ends | $8 – $15 |
| Needle-nose pliers | Bend wire hooks and grip small parts | $8 – $12 |
| Wire cutter (if not on strippers) | Cut wires to length | $5 – $10 |
| New electrical outlet (15A or 20A) | Replace old or damaged outlet | $2 – $10 |
| Outlet cover plate (if needed) | Finish the job with a clean look | $1 – $4 |
| Electrical tape | Insulate wire connections (optional but recommended) | $3 – $5 |
Total estimated cost: $40 – $80 if buying all tools new. If you already own basic screwdrivers and pliers, you only need the tester and outlet for $12–$30.
How Long Does This Take?
The entire process takes about 30–45 minutes for a first-timer. Here is the time breakdown per step:
- Step 1 – Turn off power and test: 5 minutes
- Step 2 – Remove old outlet: 5 minutes
- Step 3 – Disconnect wires: 5 minutes
- Step 4 – Prepare and connect new outlet: 10 minutes
- Step 5 – Secure and test: 5 minutes
- Step 6 – Install cover and restore power: 5 minutes
Experienced DIYers can finish in under 20 minutes. Always budget extra time for unexpected issues like stuck screws or tight wires.
Safety First
Working with electricity is dangerous. Always assume wires are live until you verify otherwise. Follow these precautions:
- Turn off the circuit breaker that powers the outlet. Flip the switch to “OFF.”
- Use a non-contact voltage tester on the outlet and wires. Hold the tester near each wire; if it beeps or lights up, power is still on. Never skip this step.
- Work in a dry area. Do not stand on wet floors or touch water while handling wires.
- Wear rubber-soled shoes and avoid wearing metal jewelry that could contact live parts.
- Only work on one outlet at a time to avoid confusion with wires.
- If you have any doubt about your ability, call a licensed electrician instead.
Step-by-Step Instructions
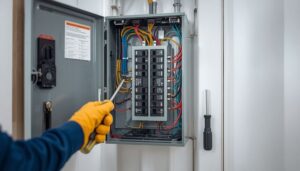
- Turn off power at the breaker panel. Locate the breaker that controls the outlet you are replacing. Flip it to the “OFF” position. If the outlet is in a room with multiple circuits, turn off the main breaker for that area to be safe.
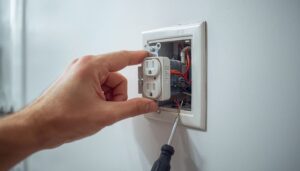
- Test the outlet with a voltage tester. Insert the non-contact tester into both slots of the outlet. If it beeps or lights up, power is still on. Do not proceed until the tester shows no voltage. Then, remove the outlet cover plate using a flathead screwdriver.
- Remove the outlet from the electrical box. Use a Phillips-head screwdriver to unscrew the two mounting screws (top and bottom) that hold the outlet to the box. Gently pull the outlet out by the tabs—do not yank on the wires.
- Disconnect the wires from the old outlet. You will see three wires: black (hot), white (neutral), and bare copper or green (ground). Loosen the terminal screws on the sides with a flathead screwdriver. Unhook each wire using needle-nose pliers. Take a photo with your phone before disconnecting to remember which wire goes where.
- Prepare the new outlet. If the wire ends look frayed or damaged, use wire strippers to cut off the damaged section and strip about 3/4 inch of insulation from each wire. For the ground wire, strip the same amount if it is insulated (if bare, skip this step). Bend each wire into a hook shape using needle-nose pliers.
- Connect wires to the new outlet. Hook the black wire clockwise around the brass-colored screw (hot side). Hook the white wire clockwise around the silver-colored screw (neutral side). Hook the ground wire clockwise around the green screw. Tighten each screw firmly with a flathead screwdriver. Wrap electrical tape around the outlet body covering the screws for extra insulation.
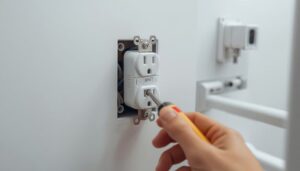
- Push the outlet into the box. Fold the wires carefully behind the outlet as you push it in. Use the mounting screws to secure the outlet to the box. Do not overtighten—snug is sufficient.
- Test the outlet before restoring power. Use the voltage tester on the wires inside the box to confirm no voltage is present. Then, turn the breaker back on. Use a plug-in tester (or a lamp) to verify the outlet works. If the lamp does not turn on, turn off the breaker and check your wire connections.
- Install the cover plate. Align the new cover plate over the outlet and tighten the center screw with a flathead screwdriver. Do not overtighten or the plate may crack.
Common Mistakes to Avoid
- Not testing for voltage before touching wires. Even if the breaker is off, a mislabeled panel or faulty breaker can leave wires live. Always test.
- Reversing hot and neutral wires. Connecting black to silver and white to brass will cause a short circuit. Follow the color code: black to brass, white to silver.
- Using the wrong screwdriver. A Phillips-head on flathead screws (or vice versa) can strip screw heads, making removal difficult. Use the correct type.
- Leaving wire insulation under the screw. The bare wire must wrap around the screw—no insulation should be trapped under the screw head. Strip enough wire to expose the conductor.
- Overcrowding the electrical box. If wires are too tight, you may damage insulation when pushing the outlet in. Gently fold wires in a zigzag pattern to fit.
When to Call a Professional
While replacing an outlet is a beginner-friendly project, some situations require a licensed electrician:
- You see aluminum wiring. Aluminum wires (silver-colored, not copper) require special connectors and outlets. Handling aluminum wiring is not safe for DIYers.
- The outlet is a GFCI or AFCI. These special outlets have different wiring and testing requirements. If you are replacing a GFCI outlet, follow a specific GFCI replacement guide or call a pro.
- Wires are damaged or burnt. Exposed copper, melted insulation, or scorch marks indicate a serious problem. An electrician can inspect the circuit for hazards.
- You feel unsure at any step. Electricity is not worth the risk. If you are uncomfortable, hire a professional. Costs typically range from $100 to $200 for a simple outlet replacement.
Frequently Asked Questions
Q: Can I use any outlet replacement?
A: No. Match the outlet type to your circuit. Most homes use 15-amp outlets (with a round pin configuration). Check the breaker rating: 15-amp breakers require 15-amp outlets; 20-amp breakers need 20-amp outlets (with a T-shaped slot).
Q: Do I need a voltage tester if I have a multimeter?
A: A multimeter works, but a non-contact voltage tester is safer and easier for beginners. It detects live wires without touching them. If using a multimeter, set it to AC voltage and probe the hot and neutral slots.
Q: What if the wires are too short to connect?
A: If wires are less than 3 inches long, do not pull them—this can damage connections inside the wall. Instead, use wire connectors and pigtails (short wire pieces) to extend them. For safety, call an electrician if you are unsure.
Q: How do I know if the outlet is grounded?
A: Look for a green or bare copper wire connected to the outlet’s green screw. If there is no ground wire, the outlet may be ungrounded. Replace it with a GFCI outlet for safety, or consult a pro.
Q: Can I replace an outlet with the power on?
A: Never. Always turn off the breaker and test for voltage. Working on live wires can cause severe shock, burns, or fire.