TL;DR: Installing a smart thermostat can save you up to 10-15% on heating and cooling costs by automatically adjusting temperatures when you’re away. This guide walks you through the entire process—from checking compatibility to wiring and setup—in about 30-60 minutes. With basic tools and a little patience, you can upgrade your home’s efficiency and control your comfort from your phone.
What You’ll Need
Before you start, gather these tools and materials. Most items are inexpensive or already in your toolbox.
| Item | Purpose | Estimated Cost |
|---|---|---|
| Smart thermostat (e.g., Nest, ecobee, Honeywell) | Main device for smart temperature control | $100–$250 |
| Smartphone with app | Set up and connect thermostat to Wi-Fi | Free (already owned) |
| Flathead and Phillips screwdrivers | Remove old thermostat and mount new one | $5–$15 (if not owned) |
| Voltage tester (non-contact) | Check if power is off before wiring | $10–$20 |
| Drill with 3/16-inch bit (optional) | If walls need new anchor holes | $20–$50 (if not owned) |
| Wire labels (provided with thermostat or use tape) | Mark wires for easy reconnection | Free (included) |
| Level | Ensure thermostat is straight | $5–$10 |
| Pencil | Mark mounting holes | $1 |
| Wall anchors and screws (if needed) | Secure mounting plate | $3–$5 |
Total estimated cost (excluding thermostat): $10–$50 if you need to buy tools.
How Long Does This Take?
Here’s a realistic breakdown of the time for each step:
- Step 1: Check compatibility and turn off power: 10 minutes
- Step 2: Remove old thermostat: 5 minutes
- Step 3: Label and disconnect wires: 5 minutes
- Step 4: Install new mounting plate: 10 minutes
- Step 5: Connect wires to smart thermostat: 10 minutes
- Step 6: Attach thermostat and restore power: 5 minutes
- Step 7: Set up Wi-Fi and app: 10–15 minutes
Total time: 45 minutes to 1 hour.
Safety First
Always turn off power to your HVAC system at the circuit breaker before touching any wires. This prevents electrical shock and damage to the thermostat. Use a voltage tester to confirm the wires are dead. If you have an older home with aluminum wiring or a heat pump system, consult a professional—this guide assumes standard copper wiring for a forced-air furnace and central air conditioner.
Never touch bare wires with wet hands or while standing on a wet floor. Work in a dry, well-lit area. If you feel unsure at any step, stop and call an electrician or HVAC technician.
Step-by-Step Instructions
- Check compatibility with your HVAC system. Most smart thermostats work with standard systems (gas, electric, heat pump, or oil), but you need to verify. Look at your current thermostat’s wires. Common wires include R (power), W (heat), Y (cool), G (fan), and C (common). If you don’t have a C-wire, your thermostat may need a power adapter or battery. Use the compatibility checker on the manufacturer’s website (e.g., Nest or ecobee) before buying.
- Turn off power to your HVAC system. Go to your circuit breaker panel and flip the switch labeled “Furnace,” “AC,” or “HVAC.” Double-check with a voltage tester by touching it to the wires at the old thermostat. If the tester lights up or beeps, the power is still on—turn off the correct breaker.
- Remove the old thermostat faceplate. Gently pull the old thermostat off its base. Most snap off or have a small screw. Set the faceplate aside—you won’t need it again.
- Label each wire with the included stickers or tape. Before disconnecting, attach a label to each wire that matches the terminal letter (e.g., R, W, Y, G, C). Take a photo of the wiring for reference. Do not let wires fall back into the wall—wrap them loosely around a pencil to keep them accessible.
- Disconnect wires from old base. Unscrew each terminal with a screwdriver and gently pull the wire out. Straighten the wire ends if they are bent or corroded. You may need to strip about 1/4 inch of insulation if the wire is frayed—use wire strippers if needed.
- Remove the old mounting base. Unscrew the base from the wall. Patch any holes with spackle if you’re moving to a new location (optional).
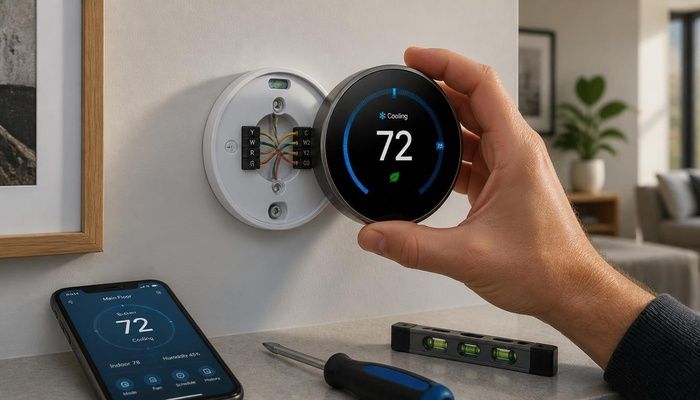
- Install the new mounting plate. Feed the wires through the center hole of the new plate. Use a level to make it straight, then mark screw holes with a pencil. If the plate covers the old holes, drill new pilot holes and insert wall anchors. Screw the plate securely into the wall.
- Connect wires to the smart thermostat terminals. Match each labeled wire to its corresponding terminal on the new base (e.g., R to R, W to W). Push the wire into the terminal until it clicks or tighten the screw. Ensure no bare wire is exposed outside the terminal—this can cause shorts. If you have a C-wire, connect it to the C terminal; if not, your thermostat may use a power extender kit (follow the manufacturer’s instructions).
- Attach the thermostat faceplate. Snap the smart thermostat onto the base. It should click into place. Turn the circuit breaker back on. Wait 30 seconds—the thermostat screen should light up. If it doesn’t, double-check your wiring.
- Set up Wi-Fi and the app. Download the manufacturer’s app (e.g., Nest, ecobee, or Honeywell Home). Follow the on-screen prompts to connect to your home’s 2.4 GHz Wi-Fi network. Enter your HVAC system type (e.g., forced air, heat pump, or boiler). Set your desired schedule and energy-saving preferences (e.g., eco mode when away).
- Test the system. In the app, manually turn on heat, cool, and fan. Listen for the furnace or AC to kick on. If something doesn’t work, check wiring connections and revisit the app settings. For more help, see how to troubleshoot a smart thermostat that won’t turn on.
Common Mistakes to Avoid
- Forgetting to label wires before removing them. Without labels, you’ll have to guess which wire goes where, which can damage the thermostat or HVAC system. Always label or take a photo first.
- Not having a C-wire (common wire). Many smart thermostats need a C-wire for power. If your system lacks one, you may need a power adapter (included with some models) or a battery-powered thermostat. Check compatibility before buying.
- Over-tightening terminal screws. This can crush the wire or strip the screw. Tighten until snug, but don’t force it.
- Installing in a bad location. Avoid placing the thermostat near windows, doors, or direct sunlight, which can fool the temperature sensor. Install it on an interior wall about 5 feet from the floor.
- Skipping the voltage test. Even with the breaker off, residual power can exist. Always test with a non-contact voltage tester to be safe.
When to Call a Professional
This guide is for confident DIYers, but sometimes it’s smarter to call an HVAC technician or electrician. Here are red flags:
- Your HVAC system uses high-voltage (120V) or line-voltage wiring. Smart thermostats are for low-voltage (24V) systems. If your wires are thick or labeled 120V, stop immediately.
- You have a heat pump with auxiliary or emergency heat. These systems are more complex and may require professional setup for proper operation.
- You don’t have a C-wire and aren’t comfortable installing a power adapter. Some adapters require wiring at the furnace control board, which involves opening the unit.
- Your old thermostat has more than 5 wires. Extra wires (like for humidifiers or dehumidifiers) can complicate installation.
- You smell gas or see water near your HVAC system. Call a professional immediately—these are safety hazards.
If you’re in doubt, a pro can install a smart thermostat for $100–$200 in labor. For more complex setups, see when to hire an electrician for thermostat installation.
Frequently Asked Questions
Q: Will a smart thermostat really save me money?
A: Yes, most homeowners save 10-15% on heating and cooling costs by using scheduling and away modes. Over a year, that’s $50–$150, depending on your climate and usage. Learn more about maximizing energy savings with a smart thermostat.
Q: What if my wires don’t match the labels on the new thermostat?
A: Some thermostats use different letters (e.g., Rh and Rc for separate heating and cooling systems). Check your old system’s manual or use the app’s compatibility guide. If wires don’t match, call the manufacturer’s support line—do not guess.
Q: Do I need a C-wire for all smart thermostats?
A: No, some models like the Nest Thermostat E can run on battery power or use a power adapter. However, a C-wire ensures reliable operation, especially if you have a heat pump or use continuous fan mode. Read how to install a C-wire adapter for your thermostat.
Q: Can I install a smart thermostat on a boiler or radiant heat system?
A: Yes, but you need a model compatible with hydronic systems (e.g., ecobee or Honeywell). These systems often use only two wires (R and W). You may need a power extender kit. Check the product specs before buying.
Q: How do I reset my smart thermostat if something goes wrong?
A: Most models have a factory reset option in the settings menu. For a hard reset, remove the faceplate, wait 10 seconds, and reattach it. If issues persist, see common smart thermostat problems and fixes.