The Chicken Bone That Cost Me a Sunday
I dropped a chicken bone down the disposal once. Just a small one — maybe an inch long. The disposal made a sound I can only describe as a blender full of rocks, then went completely silent. The reset button did nothing. The hex wrench trick (which usually saves you) did nothing. I spent the next three hours under the sink, covered in whatever had been in the trap, learning more about garbage disposals than I ever wanted to know.
That was disposal #2. I’m on #4 now across two houses, and I’ve installed every single one myself. Here’s what I wish someone had told me before I started treating my kitchen sink like a wood chipper.
What a Disposal Actually Does (It’s Not What You Think)
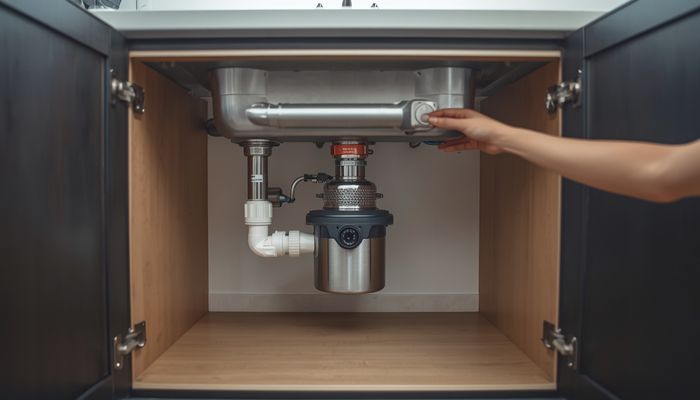
Most people picture spinning blades — like a blender or a lawn mower under the sink. That’s wrong, and believing it is how you jam your disposal. There are no blades. A disposal has a spinning disc with impellers (small metal lugs) that fling food against a stationary grinding ring. The food gets shredded into particles, water carries it through the ring, and it flows down the drain. Nothing is “cut.” Everything is pulverized by centrifugal force against a rough metal surface.
This matters because when you drop something hard down there — a bone, a fruit pit, a shot glass (yes, I’ve done that) — it jams between the spinning disc and the grinding ring. The motor can’t turn. That hum you hear when you flip the switch on a jammed disposal is the motor trying and failing to start, which overheats it and trips the thermal overload. That’s why the reset button exists.
Continuous Feed vs Batch Feed: The Choice Nobody Explains
Every disposal at Home Depot and Lowe’s is a continuous-feed model. You flip a wall switch, it runs, you feed stuff in while it’s running. This is what 95% of houses have. They’re cheap ($80-$250 for a good one) and convenient.
Batch-feed disposals only run when you put a special stopper in the drain and turn it. No wall switch needed. They’re safer (a kid can’t accidentally flip a switch with their hand in there) but they cost more ($200-$400) and very few stores stock them. I put a batch-feed Insinkerator in my last kitchen because we had toddlers. Was it worth the extra money? For peace of mind, yes. For performance, no — it’s the same grinding mechanism inside.
If you’re replacing an existing disposal and don’t have a switch loop wired, batch feed solves that problem without hiring an electrician. Otherwise, stick with continuous feed.
The Only Three Brands I’d Buy
Insinkerator makes about 80% of the residential market and there’s a reason. The Evolution series (Compact, Essential, Excel) is genuinely good. I have an Evolution Essential ($190 at Home Depot) in my current kitchen and it handles everything short of lobster shells. Their Badger series is the builder-grade budget option — it’s fine for a rental or a flip but it’s louder and the grinding components wear out faster.
Waste King is the other major player. Their Legend series uses a different motor design (permanent magnet vs induction) that spins faster and is lighter. They’re usually $20-$50 cheaper than equivalent Insinkerators. I put a Waste King L-8000 ($110) in a rental house and it’s still running five years later. The downside: they’re louder at the high end because the stainless steel grinding components resonate more.
Moen got into disposals recently and their GX series is interesting — they pre-install the power cord (Insinkerator makes you buy it separately, which is a $12 annoyance) and their mounting system is slightly easier to twist-lock. I haven’t owned one long enough to speak to durability, but the install was the smoothest of the three.
What You Can (and Absolutely Cannot) Put Down There
I’ve learned this through trial, error, and one very expensive plumber visit:
Fine: Soft food scraps, small amounts of cooked vegetables, citrus rinds (they actually clean the grinding chamber and make it smell better), ice cubes (good for knocking loose debris off the grinding ring), small amounts of cooked meat.
Borderline and risky: Coffee grounds (they don’t break down, they turn into sludge that clogs your trap), eggshells (the membrane wraps around the impellers), small bones (they bounce around and eventually jam), potato peels (they turn into paste), celery (the strings wrap around the shaft).
Do not: Grease, oil, or fat (it solidifies in your pipes and causes blockages way downstream where you can’t reach), pasta and rice (they expand in water and turn into glue), fibrous vegetables like corn husks and artichokes, anything non-food. And for the love of everything, no shot glasses. The glass fragments embed in the grinding ring and you’ll be picking them out for an hour.
Installing One Yourself (2 Hours, $0 Labor)
If you’re replacing an existing disposal, this is a genuinely approachable DIY job. If you’re installing one where there wasn’t one before, you need to add an electrical circuit and a switch — that’s an electrician’s job unless you’re very comfortable with wiring.
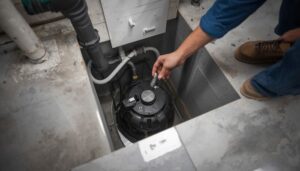
For a replacement: disconnect the drain pipe from the disposal (bucket underneath — there’s always gross water), twist the disposal off its mounting ring (it’s a bayonet mount, about a quarter turn), lower it down, lift the new one up, twist it on, reconnect the drain, plug it in. That’s really it. The mounting ring is universal (all three brands use the same three-bolt sink flange design), so you usually don’t even need to replace the flange.
My tip: before you lift the new disposal up, reach into the discharge port and make sure you’ve knocked out the dishwasher inlet plug if you have a dishwasher. Every disposal ships with that plug in place. If you forget and connect your dishwasher drain hose to a plugged inlet, you’ll flood your kitchen floor the first time you run a cycle. I know this because I did it. Twice.
The Reset Button Knows Something You Don’t
If your disposal hums but doesn’t spin, it’s jammed. Unplug it or flip the breaker. Use the hex wrench that came with it (or a 1/4-inch Allen key) in the socket on the bottom center of the unit. Work it back and forth hard until the disc frees up. Remove whatever jammed it — use tongs, not your fingers, even if it’s unplugged. Then press the red reset button on the bottom. If it clicks, the thermal overload has reset. Plug it back in and it should spin.
If the reset button won’t stay in, the motor is still too hot. Wait 15 minutes. If it still won’t reset after cooling down, the motor is fried and you’re buying a new disposal.
I’ve gone through this dance maybe 20 times. It works 90% of the time. The other 10% is when you learn that a chicken bone costs $190 and a Sunday afternoon.