
Back-Rolling Definition Home Improvement Explained: What It Is and Why It Matters
TL;DR: Back-rolling is a painting technique where you apply paint with a roller and then immediately go over it again with a dry or slightly damp roller to ensure even coverage, eliminate streaks, and improve adhesion. It’s especially important for textured surfaces, new drywall, or when using a paint sprayer, and it can dramatically improve the final finish of any painted surface.
What Is Back-Rolling in Home Improvement?
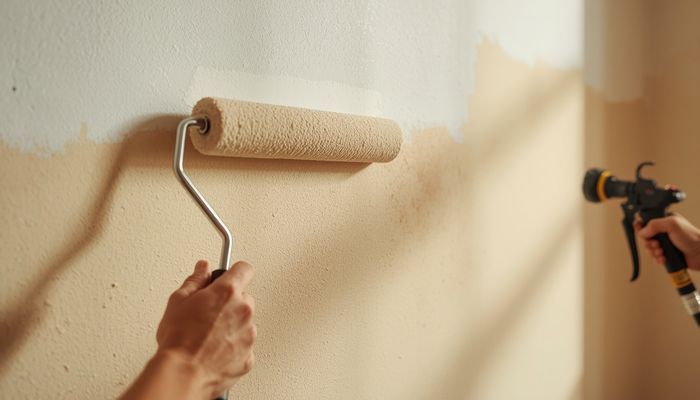
Back-rolling is a two-step painting method used to achieve a professional, streak-free finish. In simple terms, it means you apply paint to a surface (usually with a roller or sprayer) and then immediately re-roll that same area with a roller—often a dry or slightly damp roller—to smooth out the paint, remove air bubbles, and ensure the paint bonds evenly.
This technique is most commonly used in three scenarios:
- After spraying paint (to ensure the paint doesn’t just sit on the surface)
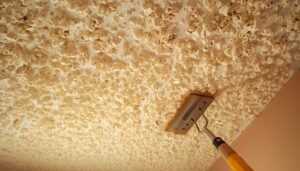
- On porous or textured surfaces (like stucco, popcorn ceilings, or brick)
- On new drywall (where the paint can soak in unevenly)
The goal of back-rolling is to eliminate common painting problems like:
- Streaks or lap marks (visible lines where paint overlaps)
- Uneven sheen (some areas looking glossy, others flat)
- Poor adhesion (paint peeling off later)
- Air bubbles or pinholes (tiny holes in the dried paint)
How Back-Rolling Works
The process is straightforward but requires good timing. Here’s a step-by-step breakdown:
Step 1: Apply the Paint
You first apply paint to the surface using either:
- A paint sprayer (for large areas or textured surfaces)
- A roller (for standard walls or ceilings)
Step 2: Immediately Back-Roll
Within 30 to 60 seconds of applying the paint, you take a roller (often with a 1/2-inch or 3/4-inch nap, depending on the surface texture) and roll over the wet paint. This second pass:
- Spreads the paint evenly across the surface
- Forces paint into pores and texture (rather than just sitting on top)
- Breaks up air bubbles that can form during spraying
- Removes excess paint that might drip or sag
Step 3: Work in Small Sections
Because paint dries quickly, you must work in manageable sections—typically 3 to 4 feet wide by the height of the wall. If you wait too long, the paint starts to set, and back-rolling can actually damage the finish.
Key Tools for Back-Rolling
- A roller frame and cover (use a nap length suited to your surface: 1/2-inch for smooth walls, 3/4-inch for light texture, 1-inch or more for heavy texture)
- A paint tray or bucket (for loading the roller)
- A sprayer (if you’re using one for the first coat)
- Extension pole (for ceilings or high walls)
Why Back-Rolling Matters in Home Improvement
Back-rolling isn’t just a fancy technique—it directly affects the durability and appearance of your paint job. Here’s why it matters for homeowners:
1. Prevents Paint Failure
When you spray paint without back-rolling, the paint can sit on top of the surface like a thin film. Over time, this film can peel, crack, or bubble—especially on porous surfaces like drywall, wood, or stucco. Back-rolling forces the paint into the pores, creating a mechanical bond that lasts.
2. Eliminates Streaks and Lap Marks
Lap marks are those ugly bands of darker or lighter paint that appear where you overlapped roller strokes. Back-rolling blends these overlaps into a uniform finish. This is critical for ceilings, where lap marks are highly visible under natural light.
3. Improves Coverage on Textured Surfaces
On rough surfaces (e.g., popcorn ceilings, knockdown texture, brick), a roller alone might miss deep crevices, while a sprayer alone might leave uncoated spots. Back-rolling ensures every nook and cranny gets covered.
4. Saves Time and Money
While back-rolling adds an extra step, it actually saves time in the long run because you avoid needing a second or third coat. It also reduces the likelihood of costly mistakes like peeling paint or uneven sheen.
5. Works with All Paint Types
Back-rolling is effective with latex, acrylic, oil-based, and even chalk paint. However, it’s most common with latex paints because they dry quickly and benefit from the mechanical bonding.
Back-Rolling vs. Related Terms
Back-rolling is often confused with similar techniques. Here’s how it compares:
| Term | Definition | Key Difference from Back-Rolling |
|---|---|---|
| Back-rolling | Re-rolling wet paint immediately after application | Focus is on smoothing and bonding, not just applying paint |
| Rolling | Applying paint with a roller in one pass | No second pass; can leave streaks on textured surfaces |
| Spraying | Applying paint with a sprayer | Fast but can leave thin spots; often needs back-rolling |
| Brushing | Using a brush for edges or small areas | Not for large surfaces; no re-rolling step |
| Stippling | Dabbing a roller to create texture | Intentional texture creation; back-rolling is for smooth finish |
Key takeaway: Back-rolling is a *finishing* step, not a *painting* step. You can roll, spray, or even brush paint, then back-roll to perfect the result.
When to Use Back-Rolling
Not every paint job needs back-rolling. Use it in these situations:
✅ When to Back-Roll
- Spraying paint on drywall, wood, or stucco – Essential for adhesion
- Painting textured ceilings or walls – Ensures even coverage in deep texture
- Applying a second coat over a patchy first coat – Blends imperfections
- Using a paint sprayer on exterior siding – Prevents peeling in weather
- Painting new drywall – Drywall soaks up paint unevenly; back-rolling fixes this
❌ When You Can Skip Back-Rolling
- Smooth, previously painted walls – A standard roller coat is usually fine
- Small touch-ups – Back-rolling a small area can leave a visible patch
- Using a high-quality self-leveling paint – Some paints level out without help
- Painting with a brush (trim, doors) – Not practical for small areas
Pro Tip: Test First
If you’re unsure, paint a small test patch and let it dry. If you see streaks, uneven sheen, or bare spots, back-rolling is your fix.
Frequently Asked Questions About Back-Rolling
1. Do I need a special roller for back-rolling?
Not necessarily, but the nap (roller cover thickness) matters. For smooth walls, use a 1/2-inch nap. For textured surfaces, use a 3/4-inch or 1-inch nap. A dry roller works best—don’t load it with paint.
2. Can I back-roll after the paint dries?
No. Back-rolling must be done while the paint is still wet—usually within 30–60 seconds of application. If the paint dries, you’ll create a rough, uneven texture. If you miss a spot, wait until the paint is fully dry, then sand and recoat.
3. Is back-rolling necessary if I use a paint sprayer?
Yes, for most surfaces. Spraying alone can leave thin spots and poor adhesion. Professional painters almost always back-roll after spraying to ensure a durable, even finish.
4. How long does back-rolling add to a painting project?
It adds about 20–30% more time. For example, a 300-square-foot room might take 2 hours to spray, but 2.5–3 hours with back-rolling. The extra time is worth it for a better result.
5. Can I back-roll with a paintbrush?
Technically yes, but it’s inefficient and leaves brush marks. A roller is far better for large surfaces. Use a brush only for edges or small patches.
Now that you understand back-rolling, check our guide on how to choose the right roller nap for your next painting project to get the best results every time.
Professional Resources: For expert wall finishing and painting guides, visit This Old House Painting and Family Handyman Painting. For paint product specifications, see Sherwin-Williams and Benjamin Moore.

Just spent 3 hours installing T-molding between my tile and new laminate. This article would’ve saved me an hour of YouTube confusion.
Great breakdown of engineered vs solid hardwood. I’ve been debating which way to go for our renovation and this helped make up my mind.