
OSB Explained Simply: What It Is and Why It Matters
TL;DR: OSB (Oriented Strand Board) is a strong, affordable engineered wood panel used in home construction for walls, roofs, and floors. It’s made by compressing wood strands with adhesive, making it more uniform and cost-effective than plywood. Understanding OSB helps homeowners make informed decisions about sheathing, subfloors, and structural repairs.
What Is OSB?
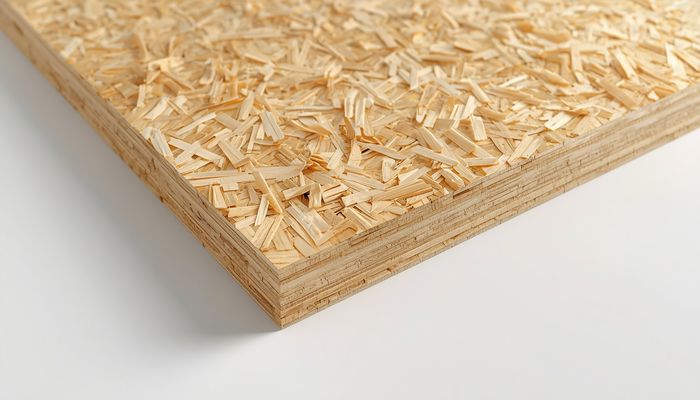
OSB stands for Oriented Strand Board. It’s an engineered wood product made by layering thin wood strands (called “strands” or “flakes”) in specific directions, then bonding them with a waterproof resin under heat and pressure.
Think of OSB as a smarter, more consistent version of particleboard. While particleboard uses small wood chips and is weak, OSB uses longer, oriented strands that create a panel with strength similar to plywood but at a lower cost. It’s typically sold in 4-foot by 8-foot sheets in thicknesses from ⅜ inch to ¾ inch.
OSB is the most common structural panel used in new home construction in North America today—roughly 70% of new homes use OSB for wall sheathing and roof decking.
How OSB Works
OSB’s strength comes from its layered construction:
- The strands are cut from small-diameter trees (usually aspen or poplar). They’re about 1–2 inches long and 1/8 inch wide.
2. Orientation is key—strands in the outer layers are aligned parallel to the panel’s length, while inner layers run perpendicular. This cross-layering gives OSB its stiffness and strength in both directions, similar to plywood’s grain structure.
3. The resin (usually a waterproof melamine-urea-formaldehyde) is mixed with wax and applied to the strands. Under heat and pressure (around 400°F and 500 psi), the resin cures, creating a solid, moisture-resistant panel.
The result is a panel with consistent density and no voids (gaps) like you might find in plywood. OSB is also less prone to warping than plywood when properly installed and kept dry.
Why OSB Matters in Home Improvement
For homeowners, OSB matters because it’s the “hidden workhorse” behind your walls, roof, and floors:
- Wall sheathing: OSB provides the structural bracing that keeps walls from racking (leaning) under wind or seismic loads. It’s what drywall and siding attach to.
- Roof decking: OSB panels form the base for shingles or metal roofing. They must be strong enough to support snow loads and foot traffic during installation.
- Subflooring: OSB is the most common subfloor material in new homes. It provides a flat, stable surface for finished flooring (hardwood, tile, carpet).
- Cost savings: OSB costs 30–50% less than plywood per sheet. For a typical 2,000-square-foot house, using OSB instead of plywood can save $1,000–$2,000.
However, OSB has one major weakness: moisture. If OSB gets wet repeatedly (e.g., from a leaky roof or poor drainage), it can swell, delaminate, and lose strength. Proper installation with a ⅛-inch gap between panels (for expansion) and adequate weather protection is critical.
OSB vs Related Terms
| Term | Description | Key Difference |
|---|---|---|
| OSB | Engineered wood panel with oriented strands | Strong, affordable, moisture-sensitive |
| Plywood | Wood veneers glued crosswise | More expensive, slightly stronger, better moisture resistance |
| Particleboard | Small wood chips + resin | Weak, not structural, used for furniture |
| MDF (Medium-Density Fiberboard) | Fine wood fibers + resin | Smooth surface, not structural, used for cabinets |
| Waferboard | Large, random wood wafers + resin | Similar to OSB but less uniform, weaker |
OSB vs Plywood: Plywood is stronger and handles moisture better, but OSB is cheaper and more consistent. For most structural applications (wall sheathing, subfloors), OSB is perfectly adequate. For outdoor use or areas prone to high humidity (like bathrooms), plywood is the better choice.
OSB vs Particleboard: Particleboard is not structural—it’s used for furniture shelves and countertops. OSB is designed for load-bearing applications. Never use particleboard where OSB is required.
When to Use OSB
Use OSB when:
- You’re building new walls, roofs, or floors in a dry climate or with proper weather protection.
- You need a cost-effective structural panel for a large project (e.g., a garage, shed, or addition).
- You’re replacing damaged sheathing on an existing wall or roof (match the thickness).
- You’re installing a subfloor before laying finished flooring (use ¾-inch OSB for spans up to 24 inches).
Avoid OSB when:
- The area is exposed to direct moisture (e.g., outdoor siding, roof overhangs, or bathroom walls). Use plywood or treated plywood instead.
- You need a smooth, paint-ready surface (OSB’s rough texture shows through paint). Use plywood or MDF for finished surfaces.
- You’re working in a high-humidity region (e.g., coastal areas). Plywood is more dimensionally stable.
Frequently Asked Questions About OSB
1. Is OSB stronger than plywood?
In most structural applications, OSB and plywood have similar strength ratings. However, plywood is slightly stronger in bending and has better nail-holding capacity. For walls and roofs, OSB is perfectly adequate.
2. Can OSB get wet?
OSB can handle occasional moisture (e.g., rain during construction), but it should not stay wet. If OSB is exposed to standing water or repeated leaks, it will swell, lose strength, and may rot. Always protect OSB with house wrap, roofing felt, or paint.
3. How long does OSB last?
When properly installed and kept dry, OSB can last 30–50 years. It’s not as durable as plywood in wet conditions, but in a typical home, it will outlast the roof or siding.
4. Can I paint OSB?
Yes, but the rough texture will show through. Use a high-quality primer and two coats of paint. For a smoother finish, sand the surface lightly before painting.
5. What’s the difference between OSB and waferboard?
Waferboard is an older, less refined product that uses larger, random wood wafers. OSB uses smaller, oriented strands for better strength and uniformity. OSB has largely replaced waferboard in modern construction.
Now that you understand OSB, check our guide on [How to Choose Between OSB and Plywood for Your Next Project] for a side-by-side comparison of costs, strength, and best uses.
“`json
“`
Flooring Industry Standards: For official grading standards and installation guidelines, consult the National Wood Flooring Association (NWFA) and the World Floor Covering Association (WFCA). The Family Handyman also offers excellent DIY flooring installation guides.
🎨 Get the best results — Shop premium paint and supplies on Amazon for professional-quality finishes.
Tools & Materials for Working with OSB
Whether you’re sheathing a new wall, replacing a section of roof decking, or installing a subfloor, having the right tools on hand makes the job faster and safer. Here’s what you’ll typically need for a standard OSB installation project (covering roughly 500–800 square feet, or about 15–25 sheets).
Essential Tools:
- Circular saw with a carbide-tipped blade (40–60 teeth for clean cuts). A 7-¼ inch saw is standard; a track saw offers even straighter cuts for long panels.
- Measuring tape (25-foot minimum) and a chalk line for marking straight cuts.
- Speed square or framing square for marking 90-degree angles.
- Utility knife for trimming edges and cutting through the resin layer if needed.
- Hammer or nail gun – a 16-ounce framing hammer works, but a pneumatic or cordless nail gun (using 8d ring-shank nails) speeds up the process significantly. Expect to use about 1.5 pounds of nails per 100 square feet.
- Sawhorses (at least two) to support sheets during cutting.
- Safety gear: safety glasses, ear protection, a dust mask (OSB dust can be irritating), and work gloves.
Materials List:
- OSB panels – Choose the correct thickness for your application (more on that below). A typical 4×8 sheet of ½-inch OSB weighs about 55–60 pounds; ¾-inch sheets weigh around 75–80 pounds.
- Fasteners: 8d ring-shank nails (2.5 inches long) for wall sheathing and subfloors, or 10d nails (3 inches) for roof decking. Screws (e.g., #8 or #10 deck screws, 2–3 inches long) can be used but are more expensive and slower to install.
- Construction adhesive (optional but recommended for subfloors to reduce squeaks). A standard tube covers about 50–75 linear feet.
- Weather-resistant barrier (house wrap or felt paper) if OSB is used as exterior sheathing.
- Joint tape and patching compound if you’re using OSB as a base for tile or laminate flooring (for smoothing seams).
Time Estimate: A two-person team can typically install OSB wall sheathing on a 2,000-square-foot house in one full day (8–10 hours). A single DIYer doing a small shed or single-room subfloor should budget 4–6 hours for cutting and fastening 10–15 sheets.
Common Mistakes to Avoid When Using OSB
OSB is forgiving, but a few common errors can lead to costly problems down the road. Here’s what to watch for based on real-world contractor experience.
- Leaving gaps too tight or too wide. OSB expands and contracts with humidity. If panels are butted tight against each other, they can buckle when wet. Industry standard is a ⅛-inch gap at all panel edges and a ¼-inch gap at the perimeter (where the panel meets the foundation or roof edge). Use a 16-penny nail as a spacer for the ⅛-inch gap.
- Using the wrong thickness for the application. A common DIY mistake is using ⅜-inch OSB for roof decking when local building codes often require ½-inch or even ⅝-inch for spans over 24 inches on center. For wall sheathing, ⅜-inch is acceptable in many areas, but ½-inch is safer for wind resistance. Always check your local code. For subfloors on 16-inch joist spacing, ¾-inch OSB is the standard.
- Installing OSB in wet conditions or without proper drying. OSB is moisture-resistant, not waterproof. If panels get soaked before the roof or siding is installed, they can swell at the edges (called “edge swell”) and never fully flatten. Plan your installation during dry weather, and if rain is forecast, cover the panels with tarps. Allow any wet panels to dry completely before applying roofing or siding.
- Failing to stagger joints. All panel edges should be staggered so that no four corners meet at one point. This weakens the structure and can cause cracking. On walls, offset rows by at least one stud bay. On roofs, stagger seams by at least two rafter spaces.
- Over-driving or under-driving fasteners. Nails should be driven so the head is flush with the surface—not countersunk (which weakens holding power) and not sticking out (which snags roofing or drywall). For nail guns, adjust the depth setting. For hand nailing, stop when the head is just below the surface.
- Ignoring the orientation arrows. OSB panels have directional arrows printed on them indicating the strength axis. For roof decking, the arrow should run perpendicular to the rafters (across the span). For wall sheathing, arrows should be vertical (parallel to the studs). Installing them the wrong way reduces load capacity by up to 30%.
Avoiding these mistakes will save you from having to replace swollen panels, fix squeaky floors, or reinforce sagging roofs later. If you’re unsure, consult a local building inspector or experienced contractor before starting.
How to Choose the Right OSB Thickness for Your Project
Picking the correct OSB thickness isn’t just about strength—it affects cost, weight, and how well the panel performs over time. Here’s a practical guide based on common residential applications.
Wall Sheathing: For standard 16-inch on-center stud spacing, ⅜-inch OSB is the minimum allowed by many building codes, but ½-inch is strongly recommended for better nail-holding strength and resistance to wind loads. For 24-inch spacing, ½-inch is usually required. Cost difference: ½-inch OSB runs about 15–20% more per sheet than ⅜-inch, but the added stiffness is worth it.
Roof Decking: This is where thickness matters most due to snow loads and foot traffic. For rafters spaced 24 inches on center, ½-inch OSB is the minimum for most codes, but
Eggshell is the sweet spot for living rooms. Enough sheen to wipe marks off but not so shiny it shows every wall imperfection. My go-to recommendation.
The acoustic purpose of popcorn ceilings is actually interesting from a design history perspective. But visually? Scrape it off. Every time.