
Glue-Down Explained: What It Is and Why It Matters
TL;DR: Glue-down is a flooring installation method where planks, tiles, or sheets are permanently adhered to the subfloor using a specialized adhesive. It’s most common for vinyl, luxury vinyl plank (LVP), and some engineered wood floors. Unlike floating floors (which click together without glue) or nail-down floors, glue-down provides a solid, stable surface, but it’s more difficult to remove or replace later.
What Is Glue-Down?
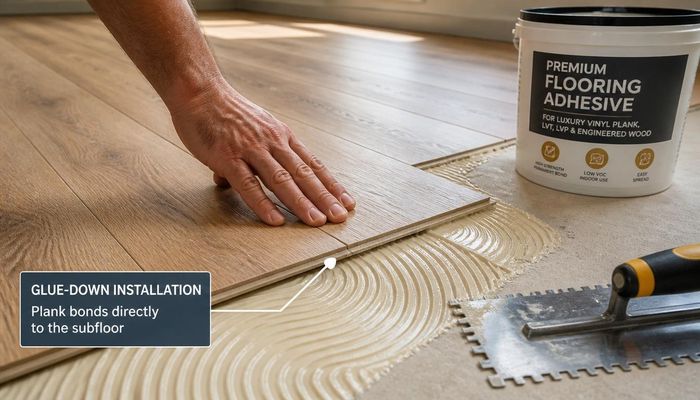
In home improvement, “glue-down” refers to a flooring installation technique where each piece of flooring material is bonded directly to the subfloor using a wet-set adhesive. The adhesive is applied either to the subfloor (the “trowel-and-glue” method) or to the back of the flooring itself (often called “peel-and-stick” or pressure-sensitive adhesive). Once the glue cures, the flooring becomes a permanent part of the structure.
Glue-down is most commonly used for:
- Luxury vinyl plank (LVP) and luxury vinyl tile (LVT) – The dominant category for glue-down floors today.
- Sheet vinyl – Large rolls are glued down to prevent curling at seams.
- Engineered hardwood – Some thinner engineered wood products require glue-down for stability.
- Cork and linoleum – Traditional sheet goods that need full-surface adhesion.
The key distinction: glue-down floors do not float. They have no expansion gap around the perimeter and are not mechanically fastened (like nail-down hardwood) or locked together (like click-lock LVP).
How Glue-Down Works
The process is straightforward but requires precision. Here’s how it typically goes:
- Subfloor preparation – The subfloor (usually plywood, concrete, or existing tile) must be clean, dry, level, and free of debris. Any imperfections can telegraph through the flooring. For concrete, moisture testing is critical – too much moisture can break down the adhesive.
2. Adhesive selection – The installer chooses a glue that matches the flooring type and subfloor. Common options:
– Urethane-based adhesives – Strong, moisture-resistant, and flexible. Best for vinyl.
– Acrylic-based adhesives – Low-VOC, water-cleanup, good for residential use.
– Pressure-sensitive adhesives – Allow some repositioning before final bond (used for peel-and-stick).
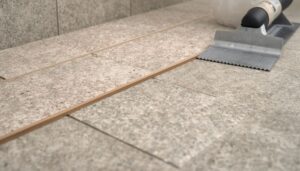
3. Applying the glue – Using a notched trowel, the installer spreads adhesive evenly across the subfloor. The trowel notch size (e.g., 1/16” x 1/16” or 1/8” x 1/8”) determines glue thickness. For peel-and-stick products, the adhesive is pre-applied to the back of each plank.
4. Laying the flooring – Planks or tiles are pressed firmly into the wet glue. For sheet vinyl, the installer uses a roller to ensure full contact and remove air bubbles. Timing matters: the glue must be “open” (still wet enough to bond) but not too wet (which can cause slippage).
5. Curing – Most adhesives require 24–48 hours to fully cure. During this time, the floor should not be walked on or exposed to heavy furniture.
Real-world example: A typical 12’ x 12’ room of glue-down LVP might require about 3–4 gallons of adhesive, applied with a 1/8” notch trowel. The installation takes one day, but the curing time adds another day before the room is usable.
Why Glue-Down Matters in Home Improvement
Understanding glue-down is important because it affects your project’s cost, durability, and future flexibility.
Pros of glue-down:
- Superior stability – The floor won’t shift, buckle, or gap, even in high-traffic areas or rooms with heavy furniture.
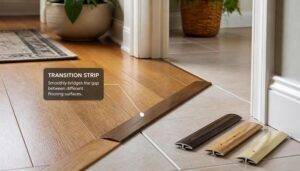
- Thinner profile – Glue-down floors are typically thinner than floating options (e.g., 4mm vs 8mm for LVP), which means less transition height between rooms and easier installation under cabinets.
- Better sound and feel – Because the floor is bonded directly to the subfloor, it feels more solid underfoot and reduces hollow sounds.
- Moisture resistance – Properly glued sheet vinyl or LVP creates a water-resistant barrier, ideal for bathrooms and kitchens (though not waterproof in flooding).
Cons of glue-down:
- Difficult to remove – Once glued, the flooring is essentially permanent. Removing it requires scraping, solvents, and often subfloor replacement. This is a major consideration for renters or those planning future renovations.
- Subfloor perfection required – Any dip, bump, or debris will show through the thin flooring. Self-leveling compound may be needed.
- Longer installation time – Adhesive application and curing add time compared to click-lock floating floors.
- VOC concerns – Some adhesives emit volatile organic compounds during installation, though low-VOC options are widely available.
Why it matters: If you’re installing flooring in a basement, bathroom, or kitchen, glue-down offers the best water resistance and stability. But if you’re a DIYer on a concrete slab, floating click-lock might be easier and more forgiving.
Glue-Down vs Related Terms
Homeowners often confuse glue-down with other installation methods. Here’s how they compare:
| Installation Method | How It Works | Best For | Removal Difficulty |
|---|---|---|---|
| Glue-Down | Adhesive bonds flooring to subfloor | Vinyl, LVP, sheet goods | High – requires scraping |
| Floating (Click-Lock) | Planks lock together, no glue, sits on underlayment | LVP, laminate, engineered wood | Low – can be disassembled |
| Nail-Down | Nails or staples through tongue-and-groove | Solid hardwood, engineered wood | Medium – requires prying |
| Peel-and-Stick | Pre-applied adhesive on back of tile/plank | Budget vinyl tiles, cork | Medium – may leave residue |
Key difference: Glue-down is permanent and subfloor-dependent, while floating floors are temporary and subfloor-forgiving. Nail-down is best for wood but requires a wooden subfloor. Peel-and-stick is the DIY-friendly version of glue-down but often less durable.
When to Use Glue-Down
Glue-down is not always the best choice. Here’s when it shines:
- Bathrooms and kitchens – The water-resistant bond of glue-down LVP or sheet vinyl protects against spills and moisture.
- Basements over concrete – Glue-down eliminates the need for a vapor barrier underlayment (common with floating floors) and prevents moisture from seeping under the floor.
- High-traffic commercial spaces – Hospitals, retail stores, and offices use glue-down for its durability and lack of movement.
- Rooms with heavy furniture – Floating floors can gap or buckle under heavy loads; glue-down stays put.
- Thin flooring profiles – If you need a low-profile floor to match existing tile or hardwood height, glue-down is often thinner.
When to avoid glue-down:
- DIY beginners – Floating click-lock is much easier and more forgiving.
- Renters – You’ll likely need to remove the floor when you move out.
- Uneven subfloors – Unless you’re willing to level the entire surface.
- Radiant heat systems – Some adhesives don’t tolerate heat cycling well; check manufacturer specs.
Frequently Asked Questions About Glue-Down
Q: Can I install glue-down flooring over existing tile?
Yes, but only if the tile is clean, level, and well-adhered. You’ll need to roughen the surface (e.g., with sanding or a primer) so the glue bonds. Grout lines may telegraph through thin vinyl.
Q: How long does glue-down flooring last?
With proper installation, glue-down LVP or sheet vinyl can last 15–25 years in residential use. In commercial settings, expect 10–15 years.
Q: Is glue-down flooring waterproof?
Not fully. While the adhesive and flooring material are water-resistant, water can still seep through seams or edges if standing water is left for extended periods. Sheet vinyl is the most water-resistant option because it has fewer seams.
Q: Can I remove glue-down flooring myself?
Yes, but it’s labor-intensive. You’ll need a floor scraper, heat gun (to soften adhesive), and possibly a solvent like adhesive remover. Expect to spend several hours per room, and the subfloor may need repair afterward.
Q: What is the cost difference between glue-down and floating floors?
Glue-down flooring itself is often cheaper (e.g., $2–$4 per sq ft for LVP vs $3–$6 per sq ft for click-lock). However, installation costs can be higher due to adhesive and labor. Total installed cost is typically comparable, within 10–20%.
Now that you understand glue-down, check our guide on “How to Choose Between Glue-Down and Floating LVP for Your Basement” to see which method fits your specific project.
Flooring Industry Standards: For official grading standards and installation guidelines, consult the National Wood Flooring Association (NWFA) and the World Floor Covering Association (WFCA). The Family Handyman also offers excellent DIY flooring installation guides.

Would you recommend this for a DIYer with moderate experience, or better to hire a pro?
Exactly the kind of practical info homeowners need. Clear, concise, and actionable.