
Cutting In Explained: What It Is and Why It Matters
TL;DR: Cutting in is the painting technique of using a brush to paint edges, corners, and trim where a roller can’t reach. It creates clean, straight lines between walls and ceilings or between different paint colors. Mastering cutting in is essential for a professional-looking paint job and can save you hours of taping time.
What Is Cutting In?
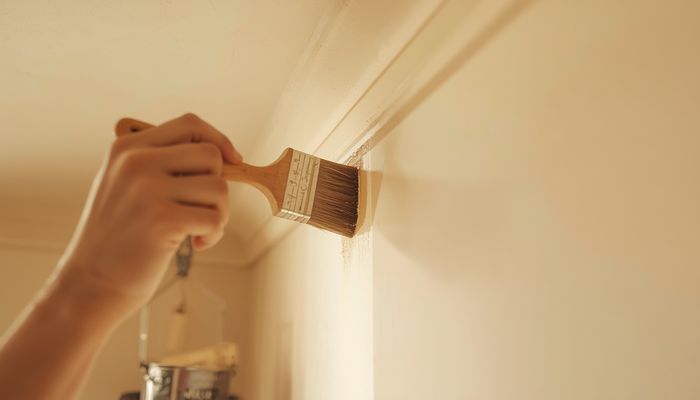
Cutting in is the process of painting a narrow border along edges, corners, and trim using a brush rather than a roller. It’s the first step in most interior painting projects, allowing you to create a crisp, straight line where two surfaces meet—like where a wall meets the ceiling, where a wall meets a window frame, or where two different paint colors meet.
The term comes from the idea that you’re “cutting” a clean edge into the paint, rather than relying on painter’s tape to create that boundary. When done correctly, cutting in eliminates the need for taping off every edge, which can be time-consuming and often leads to paint bleeding under the tape anyway.
How Cutting In Works
Cutting in requires a specific technique and the right brush. Here’s the basic process:
- Choose the right brush: Use a high-quality angled sash brush (2 to 2.5 inches wide). The angled tip allows you to paint precisely into corners and along edges without getting paint on adjacent surfaces.
2. Load the brush properly: Dip the brush about 1/3 of the way into the paint, then gently tap both sides against the inside of the paint can to remove excess. You want the brush to be loaded but not dripping.
3. Position the brush: Hold the brush like a pencil, with the angled side facing the edge you’re cutting in toward. For a ceiling line, the long side of the brush should be parallel to the ceiling.
4. Apply the paint: Start about 1/2 inch away from the edge, then gently push the brush toward the edge until the bristles just touch the ceiling or trim. Pull the brush along the edge in a smooth, steady motion. Don’t press too hard—let the bristles do the work.
5. Feather the edge: As you finish each stroke, lift the brush away from the surface to create a feathered edge. This prevents a thick paint line that will be visible after the roller work.
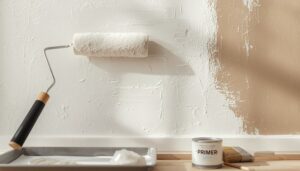
6. Work in sections: Cut in about 2–3 feet at a time, then immediately roll the wall while the cut-in paint is still wet. This helps the brushed and rolled paint blend together seamlessly.
Most homeowners can cut in about 10–15 linear feet per minute once they’ve practiced the technique. A typical 12×12-foot room requires cutting in about 60–80 linear feet of ceiling edges, plus corners and trim.
Why Cutting In Matters in Home Improvement
Cutting in is one of the most important skills in painting because it directly affects the quality of the finished job. Here’s why it matters:
- Professional appearance: A clean, straight line where wall meets ceiling is the hallmark of a professional paint job. Sloppy cutting in looks amateurish and can ruin an otherwise well-painted room.
- Time savings: While cutting in takes practice, it’s actually faster than taping off every edge. Taping a standard 12×12-foot room can take 30–45 minutes, plus waiting for the tape to set. Cutting in the same room takes 15–20 minutes with experience.
- Better results than tape: Even the best painter’s tape can allow paint to bleed underneath, especially on textured walls. Cutting in eliminates this problem entirely.
- No tape residue: Removing painter’s tape can sometimes pull off fresh paint or leave sticky residue behind. Cutting in avoids these issues.
- Cost savings: You don’t need to buy rolls of painter’s tape for every project. A good brush costs $10–15 and lasts for years with proper care.
Cutting In vs Related Terms
| Term | Definition | How It Differs from Cutting In |
|---|---|---|
| Taping | Applying painter’s tape to edges before painting | Taping creates a physical barrier; cutting in is a freehand technique |
| Back rolling | Rolling paint over a freshly brushed area to blend textures | Done immediately after cutting in, not a substitute for it |
| Edging | Using a small roller or edging tool to paint along edges | Often used as a synonym, but edging typically refers to tools while cutting in refers to brush technique |
| Caulking | Sealing gaps between trim and walls before painting | Done before cutting in to create a smooth surface for the brush |
Key distinction: Cutting in is a freehand brush technique. Edging tools (like small rollers with built-in guides) can help but rarely produce lines as clean as a skilled brush cut-in.
When to Use Cutting In
Cutting in is necessary for almost every interior painting project, but it’s especially important in these situations:
- Ceiling-to-wall transitions: Always cut in where walls meet the ceiling before rolling the walls. This is the most visible edge in any room.
- Corners: Inside corners (where two walls meet) require cutting in because a roller can’t reach into the corner.
- Around trim: Cut in around baseboards, window frames, door frames, and crown molding. For trim that’s a different color than the wall, cut in carefully to avoid getting wall paint on the trim.
- Color changes: When painting an accent wall or a two-tone design, cut in along the color boundary line for a crisp transition.
- Ceilings: When painting a ceiling a different color than the walls, cut in along the ceiling edge first.
- Textured walls: Cutting in is actually easier on textured walls because the brush bristles can work into the texture better than tape can.
When NOT to cut in: If you’re painting a whole room the same color (walls and ceiling), you can cut in once at the ceiling line, then roll everything. If you’re using painter’s tape for a very detailed pattern or stripe, tape may be more precise than freehand cutting in.
Frequently Asked Questions About Cutting In
Q: Can I use painter’s tape instead of cutting in?
A: Yes, but cutting in usually produces cleaner lines, especially on textured walls. Tape works best on smooth surfaces and for complex patterns. For most rooms, cutting in is faster and gives better results.
Q: What’s the best brush for cutting in?
A: A 2- to 2.5-inch angled sash brush with synthetic bristles (for latex paint) or natural bristles (for oil-based paint). Brands like Purdy and Wooster are industry favorites. The angled tip is essential for precision.
Q: How long does it take to learn cutting in?
A: Most people can get decent results after 15–20 minutes of practice on a scrap piece of drywall. Mastery takes a few hours of real-world painting. Start with less visible areas like corners before tackling ceiling lines.
Q: Should I cut in before or after rolling?
A: Cut in first, then roll while the cut-in paint is still wet (within 15–20 minutes). This allows the brushed and rolled paint to blend together, avoiding a visible edge where they meet.
Q: Can I cut in with a roller instead of a brush?
A: Small “edging” rollers exist, but they rarely produce lines as clean as a brush. For professional results, stick with a brush for cutting in and use a roller for the main wall areas.
Q: How do I fix a wobbly cut-in line?
A: If you make a mistake, immediately wipe the paint off with a damp cloth (for latex paint). Once dry, you can touch up with a small brush. For ceiling lines, a steady hand and a brush with a sharp angle are your best tools.
Now that you understand cutting in, check our guide on how to paint a room like a professional for step-by-step instructions from start to finish.
Professional Resources: For expert wall finishing and painting guides, visit This Old House Painting and Family Handyman Painting. For paint product specifications, see Sherwin-Williams and Benjamin Moore.


Exactly the kind of practical info homeowners need. Clear, concise, and actionable.
I’ve tried this approach in my own home. Results were good but not miraculous. Solid option for the price point.