
Transition Strip Definition Home Improvement Explained: What It Is and Why It Matters
TL;DR: A transition strip is a narrow piece of material (usually metal, wood, or vinyl) used to bridge the gap between two different flooring surfaces, such as tile and hardwood, or carpet and laminate. It prevents tripping, protects floor edges, and creates a clean, professional finish. Understanding transition strips is essential for any flooring project to ensure safety, durability, and aesthetic appeal.
What Is a Transition Strip?
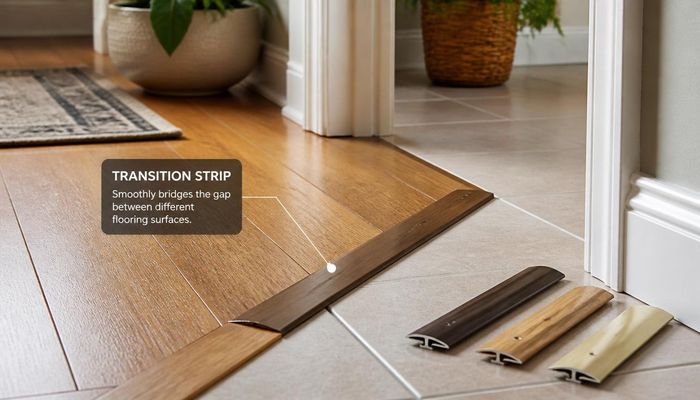
A transition strip (also called a flooring transition, threshold strip, or reducer) is a small but critical component in home flooring installations. It is a narrow, elongated piece of material that sits at the junction where two different types of flooring meet. Common examples include the line between a ceramic tile kitchen and a hardwood living room, or where carpet meets laminate in a hallway.
Transition strips come in various shapes, sizes, and materials to match different flooring types. They are typically made from:
- Wood (matching hardwood or laminate)
- Metal (aluminum or brass for durability)
- Vinyl (flexible and waterproof for tile or luxury vinyl plank)
- Rubber (for commercial or garage applications)
The primary purpose is to cover the expansion gap (usually ¼ to ½ inch) left between flooring materials, which allows for natural expansion and contraction due to temperature and humidity changes. Without a transition strip, that gap would be an eyesore and a tripping hazard.
How a Transition Strip Works
Transition strips function by bridging the height difference and gap between two flooring surfaces. Most strips have a top surface that sits flush with the higher floor and a tapered edge that slopes down to meet the lower floor. This creates a smooth, gradual transition rather than an abrupt step.
Here’s the technical breakdown:
- Installation: The strip is typically secured to the subfloor using adhesive, screws, or a track system. The track method involves a metal channel that is screwed into the subfloor, then the strip snaps into place over the channel. This allows for easy removal if needed.
- Height adjustment: Many modern transition strips have a height-adjustable design. For example, a reducer strip can handle height differences up to ½ inch, while a threshold strip can bridge gaps up to ¾ inch.
- Expansion allowance: The strip covers the expansion gap (usually ¼ to ⅜ inch) left between flooring materials. This gap prevents buckling when the flooring expands in humid weather.
- Material performance: Metal strips are ideal for high-traffic areas because they resist wear, while wood strips match the aesthetic of hardwood floors but may need refinishing over time.
Real-world example: In a kitchen with 12-inch ceramic tile and an adjacent dining room with ¾-inch solid hardwood, a T-molding transition strip is used. The T-shape sits between the two floors, covering the gap and providing a smooth surface for foot traffic. The strip is typically 36 to 48 inches long and costs $10–$30 per strip, depending on material and brand.
Why Transition Strips Matter in Home Improvement
Transition strips are not just decorative—they serve several practical and safety-critical functions:
- Safety: The most important reason. A gap between floors can catch heels, toes, or furniture legs, causing trips and falls. The U.S. Consumer Product Safety Commission reports that falls are a leading cause of home injuries, and uneven flooring is a common contributor. A transition strip eliminates this hazard.
2. Protection: Floor edges are vulnerable to chipping, cracking, or fraying. For example, the edge of a carpet can unravel, and tile edges can break. Transition strips seal these edges, extending the life of your flooring.
3. Aesthetics: A raw gap between floors looks unfinished and unprofessional. Transition strips create a clean, intentional line that enhances the overall look of your home. They can be color-matched or chosen to contrast for a design statement.
4. Functionality: Transition strips allow different flooring materials to exist side-by-side without conflict. For instance, hardwood needs an expansion gap, but tile does not. The strip covers that gap while allowing both materials to move independently.
5. Resale value: A well-installed transition strip signals quality workmanship. Homebuyers notice details like this, and a professional finish can positively influence their perception of the home’s condition.
Transition Strip vs Related Terms
It’s easy to confuse transition strips with other flooring accessories. Here’s how they differ:
| Term | Definition | Key Difference |
|---|---|---|
| Transition Strip | Bridges the gap between two different flooring types | Used between different materials (e.g., tile to wood) |
| Reducer Strip | A type of transition strip that slopes down from a higher to a lower floor | Specifically for height differences; does not bridge same-height floors |
| Threshold | A strip under a door that seals the gap between rooms or to the outside | Often thicker and includes a weather seal; may have a raised lip |
| T-Molding | A T-shaped strip that sits between two floors of equal height | Used for same-height floors (e.g., laminate to laminate) |
| Carpet Bar | A metal strip with teeth that holds carpet edges in place | Specifically for carpet; does not bridge to another floor type |
Example: If you have carpet in a bedroom and tile in the hallway, and the carpet is ½ inch lower than the tile, you need a reducer strip (a type of transition strip). If both floors are the same height, you use a T-molding.
When to Use a Transition Strip
You should install a transition strip in any situation where two different flooring materials meet. Common scenarios include:
- Tile to hardwood: In kitchens, bathrooms, or entryways where tile transitions to wood flooring in adjacent rooms.
- Carpet to laminate: In bedrooms with carpet that meets laminate in hallways or living areas.
- Laminate to vinyl: In open-concept spaces where different rooms use different resilient flooring.
- At doorways: Where flooring changes from one room to another, especially under doors.
- At expansion gaps: Where flooring meets walls, cabinets, or fixed objects (though baseboards or quarter-round are often used here instead).
When NOT to use a transition strip:
- If the same flooring material runs continuously through a room (no transition needed).
- If you are using a continuous flooring material like sheet vinyl or large-format tile that spans the entire space.
- In very low-traffic areas where a small gap is acceptable (rarely recommended).
Installation tip: Always measure the height difference between the two floors before buying a transition strip. Most strips are rated for specific height ranges (e.g., 0–¼ inch, ¼–½ inch, or ½–¾ inch). Using the wrong type can create a tripping hazard.
Frequently Asked Questions About Transition Strips
1. Do I really need a transition strip?
Yes, if you have two different flooring materials meeting. Even if the heights are perfectly matched, a gap is needed for expansion. A transition strip covers that gap and prevents tripping. Skipping it can lead to floor damage, safety hazards, and an unfinished look.
2. Can I install a transition strip myself?
Absolutely. Most transition strips come with adhesive backing or a track system that screws into the subfloor. For DIYers, the track method is easiest—just screw the track into the subfloor, then snap the strip into place. No special tools are needed beyond a drill, saw (for cutting to length), and measuring tape.
3. How do I match the color of my transition strip to my flooring?
Many manufacturers offer color-matched strips for popular brands like Shaw, Mohawk, or Armstrong. You can also buy unfinished wood strips and stain them to match. For metal strips, choose a neutral finish like brushed nickel or oil-rubbed bronze that complements both floors.
4. What’s the average cost of a transition strip?
Basic vinyl or rubber strips cost $5–$15 each. Wood strips range from $10–$30. Metal strips (aluminum or brass) are $15–$40 each. Professional installation adds $20–$50 per strip, but DIY installation saves that cost.
5. Can I use a transition strip between carpet and tile?
Yes, but you need a specific type called a carpet-to-tile transition strip. It has a flat side for the tile and a slotted or toothed side that grips the carpet edge. These are available in metal or vinyl and are common in homes with tile entryways and carpeted living rooms.
Now that you understand what a transition strip is and why it matters, you’re ready to tackle your flooring project with confidence. Check our guide on [How to Install a Transition Strip in 5 Easy Steps] for step-by-step instructions, including the tools you’ll need and common mistakes to avoid.
{
“
Flooring Industry Standards: For official grading standards and installation guidelines, consult the National Wood Flooring Association (NWFA) and the World Floor Covering Association (WFCA). The Family Handyman also offers excellent DIY flooring installation guides.


I’ve tried this approach in my own home. Results were good but not miraculous. Solid option for the price point.
Really helpful article. I’ve been researching this for weeks and this put everything together clearly.